15 FUN Letter T Crafts & Activities (2026)
Looking for some letter T crafts and activities?
I have 15 engaging activities that will help your child learn about the letter T! These activities are perfect to use in the classroom, or you can do them right at home! These play-based learning strategies will have your kids hooked on each activity!
Giving your student or child the opportunity to learn one letter at a time will help them remember each letter. By doing these fun activities, your child will create memories of each letter!
Let’s dive into my exciting activities to learn the letter T!
Activity #1: Letter Collages
Letter crafts are a great way to practice letter recognition! Focusing on one specific letter and creating something special will help them recognize and remember the letter.
For the letter T, we created a turkey! I love doing turkey crafts because you can use all the colors for the feathers! The projects always turn out cool.

How to do this activity
A. Materials you need
- construction paper
- Fruit Loops
- googly eyes
- glue stick
- glue
- scissors
- white paper
B. Set-up
Create a bubble letter T using brown paper! Add on googly eyes, an orange beak, and a red snood (side note: I laugh every time I write this word).
Make the turkey’s feathers using colored paper!
C. Activity
You’ll first want the kids to glue down the feathers so it’s in the back of the turkey. Then, paste the letter T on top of the feathers.
Grab some Fruit Loops and have the kids work on color matching skills! They can glue the Fruit Loops onto the turkey or they can just place them on.
RELATED: Sensory Activities for Kids
Activity #2: Do-A-Dot Letter Search
Who doesn’t love mess-free art?! Do-A-Dot paint markers pretty mess-free as long as your little one doesn’t wipe them all over their hand, wishful thinking, right?!
This printable is a perfect way to let you know if your little one can differentiate upper and lower case letters!

How to do this activity
A. Materials you need
- A-Z Letter Do-A-Dot Sheets
- Do-A-Dot markers
A-Z Letter Do-A-Dot Printable

B. Set-up
Print off the pages and get the paint markers ready!
C. Activity
Your little ones with use the paint markers to place specific colored dots on the upper case letter and lower case letters! This is a wonderful way to also work on color-coding skills!
If you don’t have do-a-dot markers, you can use crayons to do this activity as well!
RELATED: Teaching Resources
Activity #3: Tape Resist Art
I love how tape resist art turns out! It’s so cool to see the outline of the object when you are done!
Your kids will be amazed to see their letters jump out at them after they are done painting. This is a wonderful way to include both upper and lower case letters into art for kids.

How to do this activity
A. Materials you need
- colored masking tape
- watercolors
- paintbrush
- art tray
- cardstock paper

B. Set-up
Create an upper and lower case letter T on the piece of cardstock paper with the masking tape! Also, grab some water for the watercolors.
C. Activity
Paint around both of the letters. When they are done, they can pull off the tape gently! They can see the outline of the letters! They will love seeing what they created!
RELATED: The BEST Sensory Bins for Kids
Activity #4: Find and Cover
A great manipulative to use for hands-on learning activities is counting cubes! There are so many ways these can be used.
One of the ways I love to use them is by doing a Find and Cover activity! This is an activity that focuses on one letter at a time. It also focuses on both the upper and lower case letter.

How to do this activity
A. Materials you need
- Find and Cover printable
- counting cubes
Click HERE for your Find had Cover Letter Printables.

B. Set-up
Print off the letter T and any other letter you want to work on with your little one.
C. Activity
Have your child identify the letter. Then, have them tell you which one is upper case and which one is lower case. Explain to them what a key means. Show them that they are to look at the key to see what color represents the upper and lower case letters.
They should place that colored counting cube on the correct letters!
RELATED: ABCDeeLearning’s Teacher’s Pay Teacher’s Store
Activity #5: Play-Doh Letter Building
Whenever I pull out the Play-Doh, the kids play for it for at least a half-hour. You know, that’s kind of a big deal, right? Most of the time, it’s longer than that, but at least a half-hour!
Since Play-Doh is so engaging for kids, it makes for a wonderful learning activity!

How to do this activity
A. Materials you need
- My Letter Play-Doh mats
- Play-doh
- dry erase folders
Click HERE to grab your Letter Play-Doh Mats! (Upper and Lower case letter included)

B. Set-up
Print off the letters that you want to work on! Then, place them inside a dry-erase folder for your little ones to build on. This way, it won’t get the sheet dirty, and you can save and redo it repeatedly.
C. Activity
Your little ones should roll and create the letters using Play-Doh. You can have them match the colors on the sheet, or you can use whatever color you’d like. They should try to create the letter by following the lines!
RELATED: 15 SIMPLE Letter C Activities
Activity #6: Salt Painting
Have you ever tried salt painting? It always turns out SO pretty!
Kids love watching the paint flow throughout the salt. It’s a relaxing way to paint, and the kids will love trying a new way to create art.

How to do this activity
A. Materials you need
- cardboard
- pencil
- glue
- salt
- watercolors
- paintbrush
- art tray

B. Set-up
On your piece of cardboard, draw the letter T with a pencil. Then, outline the letter in glue. Make sure to place the cardboard on an art tray for the next part! Shake a whole bunch of salt all over the glue, then dump the access in the trash.
*You have to let the glue dry before you start painting, or else it will be REALLY messy!*
C. Activity
Have your little ones use watercolor paints to paint the salt! It looks terrific, too, when you mix different colors throughout the letter.
RELATED: 15 Easy Letter B Activities
Activity #7: Hidden Letter Search
You gotta love free printables! This hidden search-free printable is the perfect way for your little one to work on recognizing the upper and lower case letter T.
All the letters of the alphabet are included in this freebie pack! So you can practice each of the letters using my sheets.

How to do this activity
A. Materials you need
Click HERE for your FREE Hidden Letters Printables
B. Set-up
Print out my sheet and grab some coloring supplies!
C. Activity
This printable can be used in two different ways.
- You can have the kids find and color the letter on the sheet
- They can color in all the other letters but that letter!
See if they can tell what letter they created when they are finished coloring!
RELATED: FREE Alphabet Printables
Activity #8: Beginning Sounds
Talking about animals or objects that start with the letter will help bring the letter to life for your little one.
These beginning letter worksheets are a perfect way to show your little one some fun things that start with the letter T!

How to do this activity:
A. Materials you need
- Beginning Sound Letter Sheets
- crayons
Click HERE to grab your Beginning Sound Letter Sheets.

2. Setup
Print off the worksheet and grab your crayons!
3. Activity
Go through each object or animal inside the letter T. Say each thing’s name and make each object’s beginning sound before saying the whole word. This will help your little one understand the starting sound of each picture they see.
They will color each thing that starts with the letter T!
I have beginning sound sheets for each letter of the alphabet! Create a booklet to go over each of the sounds that the letters make. This will make for a great resource to use repeatedly.
RELATED: Teaching Resources
Activity #9: Geoboard Letters
Do you remember using these boards as kids? I remember loving when my teacher pulled them out so we could play and create with them!
Work on creating letters with the geoboard! This is not only an excellent way to work on letter-building skills, but it’s a great fine motor activity for kids!

How to do this activity
A. Materials you need
- geoboard letter printable
- rubberbands
- geoboards
Click HERE to grab your Geoboard Lower Case Letter Printable.

B. Set-up
Use my geoboard letter worksheets to help your little ones build the letters! Print off the letter T and any other letter you want to work on.
C. Activity
Your little one will use the rubber bands to build the letter T. Younger ones can use the worksheets to help guide them on building the letter. Older children can be challenged by trying to do it on their own!
RELATED: Fun Fine Motor Activities for Kids
Activity #10: Turtle Craft
Turtles are the perfect craft to make for the letter T!
We had fun using different materials to create the turtle’s shells for this activity.

How to do this activity
A. Materials you need
- cardboard/paper
- box cutter (optional)
- buttons
- colored paper
- googly eyes
- tissue paper
- colored poms
- glue
- hot glue
- scissors

B. Set-up
Grab a bowl and trace a circle for the shell. If you decide to use cardboard, you’ll need a box cutter to cut it out. You’ll just need to use scissors to cut it out on paper!
Create the turtle’s head, and feet using colored paper! Glue these pieces on the bottom of the cardboard or paper.
C. Activity
Depending on what supplies you are using for the shells, you’ll need different glue. You can use regular glue for the buttons and the tissue paper. Fort he poms, you need to use hot glue so they stick!
The kids can just glue on the colored buttons. For the tissue paper, they can scrunch the paper up and then glue them on the shells.
These different materials are SO fun to work with!
Activity #11: Tree Art
This is one of my favorite projects that we have ever done! Trees are perfect to create for the letter T!
I love that this activity involves the use of your little ones’ hands and fingerprints. It makes for the perfect keepsake!

How to do this activity
A. Materials you need
- brown construction paper
- washable paint
- scissors
- glue stick
- white paper
- paint tray

B. Set-up
Trace your little one’s hand on brown paper. Put 4 pieces of brown paper together so you just have to do this once. Then, cut them out and paste them to white paper!
Dump some paint into a paint tray!
C. Activity
Talk about the different seasons with your child. Discuss the colors that each season brings to the trees. Then, have them dip their fingers into the paint and make prints around their handprints for the leaves (or snow).
RELATED: Spring Crafts and Activities
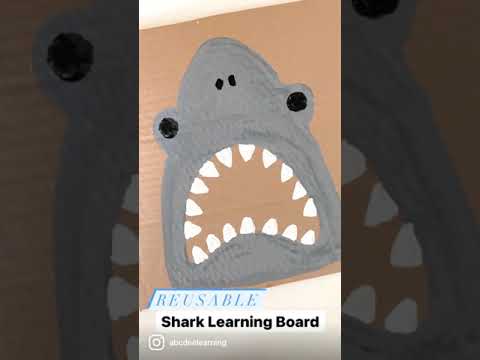
Activity #12: Shark Tooth Activity
This shark teeth activity is TOO much fun! I absolutely love reusable boards. You make it once then it can be used repeatedly.
This one is perfect for the letter T for tooth and toothbrush! The kids will get a kick of being able to brush the sharks teeth.
How to do this activity
A. Materials you need
- cardboard
- acrylic paint
- packing tape
- dry erase marker
- toothbrush (one you won’t use!)
- shark template (FREE!)
Click HERE for your FREE Shark Learning Pack

B. Set-up
Grab my FREE shark template in my Shark Learning Pack. Print the last sheet in the pack and trace it on cardboard.
Then, paint the shark using acrylic paint! Once it dries, wrap packing tape over the entire piece of cardboard.
C. Activity
Write letters of the alphabet on the teeth using a dry erase marker. Ask your little one to find the letter and use a toothbrush to brush that letter off the sharks teeth. Once they have found all the letters, you can write new ones!
You can also do this with numbers or even sight words for older ones!
RELATED: Hands-on Alphabet Printables
Activity #13: LEGO Letters
Got a kiddo who loves to use building with blocks? This activity will be right up their alley!
LEGO’s are an open-ended toy that I absolutely love using for learning activities. The possibilities are endless when it comes to using them!

Building letters is just one way that they can be used! This is a wonderful hands-on learning activity that helps kids understand how each letter shape is formed!
How to do this activity
A. Materials you need
- LEGO Letter Building Mats
- LEGO’s
Click HERE for your LEGO Letter Mats

B. Set-up
Print off the sheets and grab your LEGO’s.
C. Activity
Your child will use the blocks to create the letter T. You can have them use little or DUPLO blocks for this activity. This activity asks them to identify each letter is they create and how many blocks it took for them to create the letter.
If you decide to do more letters than just T, they can see the letters’ differences!
RELATED: The BEST Open-Ended Toys For Kids
Activity #14: Popsicle Stick Letter Building
Building letters with popsicle sticks work on SO many different learning skills.
This specific activity works on letter recognition, counting skills, STEM skills, and pre-writing skills! It’s perfect for school centers or just for home learning!

How to do this activity
A. Materials you need
- popsicle stick letter cards
- popsicle sticks
- pencil
Click HERE for your Popsicle Stick Letter Cards

B. Set-up
Print off the letter cards and grab the popsicle sticks!
C. Activity
Your kids will use the cards to help them know how to create each letter! Count how many popsicle sticks it takes to create the letters.
RELATED: My 10 Favorite Learning Supplies
Activity #15: Color Coding Letters
Want to try a beginner color-coding activity that’s perfect for preschoolers? I love that it works on several skills with just 1 easy setup as well!
This activity works on color recognition, color matching, number recognition, and letter building! Wow, that’s pretty amazing if you ask me.

How to do this activity
A. Materials you need
- cardboard
- plastic bottle caps
- Sharpie
- dot stickers
- pom poms
- kid-friendly tweezers

B. Set-up
Inside the bottle caps, place a dot sticker with the numbers 1-3 written on them. Older children can have more numbers and colors!
Create the letter T on the cardboard with the bottle caps in a mixed-up order. Write what each number signifies on the side; you can use a pom too for younger ones. Older kiddos can work on color sight word recognition.
C. Activity
Have your child use the key to place the correct colored pom in each bottle cap to create the letter T! This works on letter building, color recognition, and number recognition!
Want to add in some fine motor skills? Have them use tweezers to pick up and place the poms inside the caps!
RELATED: FUN Fine Motor Activities for Kids
Final Thoughts and Conclusion
Individual letter activities are a fantastic way for kids to really grasp letter recognition of each letter of the alphabet! Doing some of these activities will help your little ones remember each letter of the alphabet.
To go along with these activities, I suggest reviewing the alphabet letters once a day for at least 5 minutes. That’s it! 5 minutes is all it takes if you consistently go over the information with them; you’re going to see how they can pick up the information if repeated daily.
Happy Learning!


