30+ FUN Summer Camp Art Projects
Looking for summer camp art projects?
I have 30 adorable summer camp arts and crafts that will keep the kids busy throughout the entire summer.
Let’s get started!
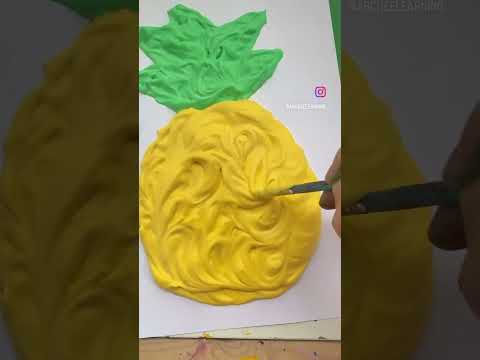
#1: Puffy Paint Art
Making your own puffy paint is fun and easy! This is a great summer camp art project!
This puffy paint recipe dries in about 2-3 hours, and it will dry puffy!

How to do this activity
A. Materials you need
- Elmer’s school glue
- foam shaving cream
- paint brushes
- spoon
- cardstock paper
- food coloring
B. Set-up
In a bowl, mix equal parts of foam shaving cream and glue together. If you want it to be more puffy, add a bit more shaving foam.
To add color to the puffy paint, mix some food coloring in.
C. Activity
Create the pictures you want to make on a piece of cardstock paper with a pencil. This will help your kids be able to paint within the lines.
They will use a small spoon to scoop out the puffy paint to put it on the paper. Then, they will spread it out using a paintbrush!
We created a watermelon, ice cream cone, and pineapple. Once you are done filling all the paint in, you can add fun extras like black beans, craft poms, or sprinkles! They will stick on and stay!
Let these dry for about 3 hours. Feel how soft they are! Your kids will love this sensory craft.
RELATED: Sensory Activities for Kids
#2: Salt Painting
Salt painting is such a fun process! Kids will love this different summer camp art project.
We have done so many fun salt-painting projects! I love these the most on the black paper.

How to do this activity
A. Materials you need
- table salt
- watercolors
- glue
- cardstock paper (must be this paper)
- paintbrush

B. Set-up
Draw your pictures with a pencil and outline them in glue.
Do this on cardstock paper. If you do this project on construction paper, it won’t work; it’ll soak through the paper and be all wet.

C. Activity
Dump salt onto the glue! Don’t be shy, you can add a lot. I find it best when there is a lot of salt on the glue.
Do this on an art tray, and dump the rest of the salt off.
Then, use watercolors to paint the salt. You can do this right away, or you can wait for it to dry.
RELATED: Flower Crafts
#3: Foil Painting
Here is a summer camp art project that will be a huge hit! Hearing the sound of the foil when you paint on it is great.
I always have foil on hand in the kitchen, which makes it easy.

How to do this activity
A. Materials you need
- foil
- acrylic paint
- paint brushes
- hot glue
- paint tray

B. Set-up
Draw your image on foil using a pencil. You can skip this part and just paint straight on the foil if you want to. Adding the hot glue is great for smaller children, so they know where to paint!
C. Activity
Outline your pictures in hot glue. Then, have the kids start painting with acrylic paint.
We like to use acrylic paint because they colors turn out so bold! Make sure to wear clothes you don’t mind getting dirty just in case they get some paint on themselves.
When the paint is dry, you can even peel off the hot glue!
RELATED: Rainbow Crafts
#4: Ice Paints
Creating ice paints is super easy and fun for kids to use as a summer camp art project.
This can be an indoor fun craft to do on a hot summer day.

How to do this activity
A. Materials you need
- Crayola bright color washable paint
- popsicle sticks
- ice cube tray
- cardstock paper
B. Set-up
Add some washable paint into the paint tray. We got a large silicone square ice mold for this so the paints were larger.
I didn’t measure this out at all, I just dumped some paint and water in the mold.
Then, add water in the tray and mix each one up with a popsicle stick or spoon.

C. Activity
Break a popsicle stick in half and place one in each section of the paints so it’s easy for the kids to use.
Then, stick the paints in the freezer overnight.
Pull them out and run the bottom under warm water for a few seconds to loosen up the ice paints and pull them out.
Have the kids create lines, color in pictures, or create designs of their own!
RELATED: Painting Ideas
#5: Boat Crafts
Make your own boats this summer for your kids to play with in the water!
This is great to make for the pool, water table, or even just a plastic container. This summer camp art project is perfect for kids.

How to do this activity
A. Materials you need
- pool noodles
- knife (adult will use)
- wine corks
- small rubber bands
- sponges
- skewers
- foam paper
- scissors

B. Set-up
Cut the pool noodle into small sections using a knife. The adult will do this part of the project.
Grab the rest of your supplies to make the boats!
C. Activity
Create a triangle shape out of foam paper and cut it out. Then, cut a skewer to be able to fit on the foam paper. Poke holes at the bottom and top of the foam paper to make the sail. You will do this for each of the types of boats.
To make the wine cork boats, grab 3 wine corks and wrap two small rubber bands around them to hold them together. Then, poke the skewer through the middle wine cork to make the boat!
Create the sponge boats by cutting a little off of the sponge so it’s not so big. Then, poke the skewer through to make the boat. I suggest using a more heavy-duty sponge, we used the dollar store brand, and it didn’t hold up as well.
Lastly, make the pool noodle boats by poking the skewer through one side of the pool noodle, and you have three boats!
Add water to a sensory bin. You can use blue food coloring to color it or leave it the way it is.
Let the kids play with the boats by using a straw to blow them around. They can also just play with them with their hands or even add small toys to them.
#6: Plate Sunshine
Looking for ways to keep your kids learning over summer break? This is a fun summer camp art project to practice the alphabet.
I love how bright this sun craft is! This craft also works on strengthening fine motor skills.

How to do this activity
A. Materials you need
- paper plate
- acrylic paint
- yellow clothespins
- Sharpie
B. Set-up
Paint your paper plate yellow using acrylic paint. We like to use acrylic paint because the colors turn out bolder.
While you are waiting for the plate to dry, write the letters on your clothespins. We practiced matching upper to lower case letters but you can also practice matching the same letters.

C. Activity
Onec the plate is dry, create a face for the sun! Then, write the letters around the sun on the outside of the plate.
Have the kids match up the letters with the clothespin. They will open the clothespin and attach it to the correct letter.
Have the kids say the letters out loud so you know they know what each letter is.
RELATED: Alphabet Activities for Kids
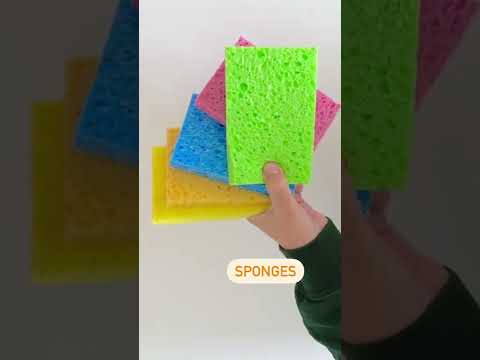
#7: Sponge Balls
This is a must-try summer camp art project and activity to do with kids.
They are easy to make, the kids had a blast, and there weren’t a million pieces to pick up like there would be if you used water balloons.

How to do this activity
A. Materials you need
B. Set-up
Cut your sponges into 4 rectangular pieces. You need two sponges to make 1 sponge ball. So, there should be 8 rectangles total for each one.
Stack them on top of each other and tie them together using a string (tie tight).

C. Activity
Take these outside and play! The kids can dip them into water and have a water balloon fight, play catch, and so much more.
For other fun outdoor ideas, check out my outdoor activities article.
RELATED: Outdoor Games for Kids
#8: Flip-Flop Craft
This is the cutest keepsake summer camp art project to kick off the summer!
I love seeing the kid’s feet and handprints in art projects. It seriously never gets old to me.

How to do this activity
A. Materials you need
- cardstock
- paint
- art tray
- pipe cleaners
- hot glue
- scissors
B. Set-up
Dump some paint on an art tray! Have your little one stick one foot onto the tray.
C. Activity
Guide the foot onto a piece of paper! Press their foot down, so their toes and footprints show up good!
Wash off their foot, then have the kids dip their other foot into the paint and repeat!
Cut around the footprint so there is a little paper still on it to look like a sandal.
Cut a few pieces of pipe cleaner to be the center of the shoe! Hot glue those down on both ends to make sure they stay.
Write the kid’s initials with the year to remember when you did it!
#9: Painted Pasta
Painting pasta will be a fun process for kids. This is a great summer camp art activity for sensory. There are so many options for what you can do with it after you color the pasta too!
The process of dying the noodles is fun and simple.

How to do this activity
A. Materials you need
- cardstock paper
- noodles
- acrylic paint
- ziplock bag
- art tray
- parchment paper
- glue
B. Set-up
Add a cup of noodles into a ziplock bag and squirt some acrylic paint inside.
Shake it up and make sure the paint is covering all the noodles! Dump out to dry on parchment paper.
Make sure to separate the noodles so they don’t stick together. Repeat this process for each color of the rainbow.
C. Activity
Wait for the noodles to dry. This process takes about 20 minutes for them to dry fully!
Then, have the kids use school glue to create a rainbow! Add a little glue to the noodle and stick it to the paper.
This is a great sensory craft for kids.
#10: Watermelon Handprint
This watermelon handprint craft is the perfect summer camp art activity for kids.
Handprint crafts are the best. They are always the crafts we end up keeping throughout the years.

How to do this activity
A. Materials you need
- cardstock paper
- acrylic paint
B. Set-up
Paint your child’s upper hand and fingers pink. Then, on the lower end on their hand, make white strip and a green strip at the bottom for the rind.
C. Activity
Place their hand down on cardstock paper and press their entire hand down to ensure it will all show up.
Slowly peel it up! Then, have the kids make black fingerprints for the watermelon seeds.
Write a fun summer message on the card. This can be a keepsake for your family or you can give it to your child’s teacher or a family member.
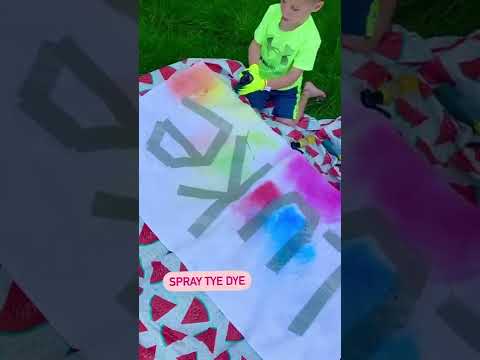
#11: Tie Dye Beach Towels
There couldn’t be a better summer camp art activity! Tie-dye is a must-do activity over the summer.
This method of tie-dying is EASY for the kids to do because all they have to do is spray the tie-dye paint onto a towel!

How to do this activity
A. Materials you need
- white towel
- tie dye spray bottle kit
- duct tape
- table cloth

B. Set-up
Lay out the white towel and use duct tape to form the letters of your child’s name on the towel.
Then, add water to the spray bottles with the tie-dye powder.
C. Activity
Spread out a tablecloth down on the ground. You can do this on cement or grass. I suggest doing it on the grass because tie-dye can stain the cement.
Then, lay out the towel! Have the kids start spraying the towel with the tie-dye paint! They should paint the entire towel and not leave any white spots.
Let it air dry. Then, peel off the tape to reveal your kids’ names! Once one side is dry, you can flip it over and paint the other side if it didn’t go all the way through. The spray bottles tend to be weaker than the squirt bottles, so they may not soak through.
Follow the steps to ensure the tie-dye color stays!
#12: Plate Crab Craft
What an adorable summer camp art project for kids! When I was a camp counselor, we always had ocean week, so this would fit in great for that theme.
You just need a few supplies to pull off this cute activity.

How to do this activity
A. Materials you need
- paper plate
- red acrylic paint
- paintbrush
- cardstock
- google eyes
- scissors
- hot glue

B. Set-up
Fold a paper plate in half and paint it red.
Fold a piece of red cardstock in half! Then, create a rectangle for the eyes, claws, and two sets of legs. Do this on the crease of the paper, so it makes double (makes it go faster!)
C. Activity
Cut out all the parts made from cardstock and glue them on using hot glue if you are in a rush. If you aren’t, you can use regular glue.
Add some googly eyes to the rectangles!
You can rock these back and forth if placed on a flat surface for some extra fun.
RELATED: Crab Crafts for Kids
#13: Painting Rocks
My kids LOVE painting rocks. It’s something fun and different for them to create.
Painting rocks is a great summer camp art activity! You can even place them around outside the camp.

How to do this activity
A. Materials you need
- rocks
- acrylic paint
- paintbrushes
- googly eyes
- glue
B. Set-up
Head outside and grab the rocks you want to paint! Try to find large flat rocks!
C. Activity
Use acrylic paint to paint the rocks any way you’d like! I have a few fun suggestions that are easy for kids in the photo.
Paint the first layer on and wait for it to dry. Then, you can paint your design or you can even fingerprint your designs.
RELATED: Outdoor Activities for Kids
#14: Squirt Art
Looking for a fun new way to paint with your kids? This is a must try summer camp art project.
They will love using a squirt gun to paint and create a masterpiece! This process to this art project is WAY too much fun!

How to do this activity
A. Materials you need
- squirt guns
- liquid watercolors
- canvas

B. Set-up
Put the liquid watercolors in each squirt gun! I used 4 squirt guns with different colors inside.
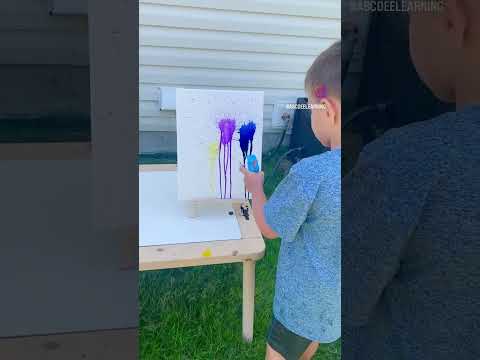
C. Activity
Let the kids spray away! Easy as that. They will LOVE seeing the colors appear and drip down the canvas!
RELATED: Outdoor Activities for Kids
#15: Splat Art Butterfly
Splat art is a fun process for kids to create! They love being able to smoosh the paper together and reveal the other side.
This summer camp art project turns out so pretty!

How to do this activity
A. Materials you need
- black cardstock paper
- Q-tips
- acrylic paint
- scissors
- glue stick
B. Set-up
Create a butterfly shape on black cardstock paper and cut it out.

C. Activity
Use a Q-tip and dip it into paint and use it as a paintbrush to create your butterfly designs. You’ll make the design on one side of the butterflies wing.
Then, fold the butterfly shape over and press down around the entire shape.
Then, peel it open to reveal the symmetry on the other side! This is such a fun process.
Lastly, create the middle of the butterfly by drawing an oval shape. Make paper antenna and glue it of the back of the butterfly.
RELATED: Butterfly Crafts
#16: Flower Pot Painting
In my opinion, this is my favorite summer camp art activity for kids. The kids loved creating these flower pots, and they get to see them outside all summer.
These can stay around at camp, or kids can take them home!

How to do this activity
A. Materials you need
- flower pots
- flowers
- acrylic paint
- acrylic paint markers
- clear sealer
B. Set-up
Do the first layer of paint on your flower pots with acrylic paint. We made a watermelon and ladybug pot, and we did a drip paint activity. So we painted one pink and two of them white.
I also added a green at the top of the watermelon pot and red on the ladybug pot.
Wait for your flower pots to dry (this will take about 30 minutes to dry completely).
C. Activity
For the watermelon flower pot, have the kids make black fingerprints around it.
To create the ladybug flower pot, the kids will make fingerprints using red paint. Then, once those are dry, use a black acrylic paint marker to create a head, legs, antenna, and dots on each ladybug.
Lastly, to create the dip paint flower pot, have the kids squeeze acrylic paint all over the pot. They can use a bunch of different colors to make it look really cool! There’s no wrong way to do this one!
Let these dry completely- the drip paint one takes a few hours.
Once they are dry, spray them with an acrylic paint-clear sealer. Do this outside because it can smell bad.
Then, you have your beautiful flower pots that will stay all spring and summer long!
RELATED: Nature Crafts for Kids
#17: Bubble Painting
What a fun summer camp art idea! This one should be done outside!
This activity is for ages 6+. Kids should not inhale when placing the water bottle in their mouth because the solution will come back up into their mouth.

How to do this activity
A. Materials you need
- bubble solution
- cardstock paper
- food coloring
- old sock
- hair tie/rubber band
- plate
- scissors/knife
B. Set-up
Cut 1/4 of the water bottle off the bottom. I suggest using a water bottle like Aquafina for this project. It works better when it’s more sturdy.
To cut the water bottle, you can use scissors, or you may need to use a knife. This part should be done by the adult.

C. Activity
Cut an old sock and wrap it around the open part at the bottom. Secure it with a rubber band or hair tie.
Add some food coloring (gel) to the bottom of the sock. We chose to use three different colors at a time.
Dip the water bottle in bubble solution and start to blow from the top of the water bottle. It should come out like a snake!
Place cardstock paper under the bubbles to create some awesome bubble art prints!
#18: Lemonade Craft
Ice-cold lemonade is the best on a hot summer day! This summer camp art project is perfect! Especially if you have a lemonade stand with the kids planned.

How to do this activity
A. Materials you need
- cardboard
- straws
- paintbrush
- white paint
- box cutter
- art tray
- hot glue
- acrylic paint
- lemons
- knife

B. Set-up
Create a cup shape using a pencil on cardboard.
Cut it out using a box cutter, and then paint it pink or yellow with acrylic paint!
Cut a lemon in half and get some yellow acrylic paint ready for the kids.
C. Activity
Have the kids dip the cut lemon in yellow paint. They want to make sure that too much isn’t on the lemon, or it will not make the best prints.
They will make several prints on each cup. Then, they will paint a few white ice cubes on cardboard.
Hot glue a straw in the center of the cup and bend it, so it looks like it’s ready to drink!
This will look so good; you will have to grab some lemonade after making it!
#19: DIY Sidewalk Chalk Paint
Making your own sidewalk chalk is easy, and it’s a fun summer camp art activity to do with the kids.
I love that you can use squirt bottles for this type of sidewalk chalk! It’s something fun and different.

How to do this activity
A. Materials you need
- water
- cornstarch
- baking soda
- food coloring
- squirt bottles/muffin tin
B. Set-up
Mix one cup of water and 1/2 cup of cornstarch together in a bowl. Add 1/3 cup baking soda and mix again!
Then, add the color of the food coloring that you want.
Repeat this process for each color that you want to create.
C. Activity
Pour into the squirt bottles of create this in a muffin tray!
Then, let the kids go outside and paint with the sidewalk chalk. This comes up easily off the cement, I just recommend removing it after playing with a hose and not letting it dry!
#20: Paper Plate Fish Craft
Here’s another cute idea for an ocean-themed summer camp art project!
Kids will love creating this fish craft!

How to do this activity
A. Materials you need
- paper plate
- acrylic paint
- cardstock paper
- glue stick
- scissors
- pencil
- googly eye
- paintbrush

B. Set-up
Create a cut in the middle of the plate to be the mouth for the fish! The piece you cut out will actually become the tail.
Then, use acrylic paint to paint the paper plate. We use acrylic paint because it dries faster than washable paint.
C. Activity
To create the scales for the fish, you’ll fold a piece of cardstock paper and draw semi-circles on the edges so they pop up!
The kids can cut them out, or you can! Then, they will use a glue stick to glue the scales on. We alternated a few different colors! You can do this or keep it one color.
Glue the tail on the fish and add a googly eye to complete the craft!
RELATED: Fish Crafts for Kids
#21: Fingerprint Pineapple
This is an adorable summer camp art activity for kids, and it’s so simple!
Plus, it’s a cute keepsake with handprints on the top of the pineapple.

How to do this activity
A. Materials you need
- colored cardstock paper
- orange and yellow paint
- scissors
- glue stick
B. Set-up
Create an oval shape for the pineapple, and have your child work on cutting skills to cut it out!
Then, fold a piece of green construction paper in half and trace your child’s hand on it to make two copies!
C. Activity
Have your child paste the oval onto paper and paste their handprints at the top of the oval to make the pineapple.
Then, have them create fingerprints on the inside part of the pineapple with orange and yellow paint!
This is such a simple and adorable summer craft.
#22: Bird Feeder Craft
How cool are these DIY bird feeders? This is a great summer camp art activity to do with the kids and hang up outside your rooms!
Check out all the birds that come to your feeders!

How to do this activity
A. Materials you need
- sugar ice cream cones
- peanut butter
- bird seed
- twine
- plastic knife
B. Set-up
Cut the tip off the top of the ice cream cone. Then, thread a piece of twine through the top of the hole and make a knot (I made a few) so it won’t go through the cone.

C. Activity
Thread cheerios on the top (optional), but leave some space so it can be hung up.
Have the kids spread peanut butter around the entire cone. Then, sprinkle birdseed all over the cone so it sticks to the peanut butter.
Hang up outside and watch the birds hang out at your DIY bird feeder.
Want to learn more about bird feeding? My husband’s an expert; check out his page below.
RELATED: Birdwatching HQ
#23: Grow Caterpillars
So this isn’t really a summer camp art activity, but it’s an awesome activity to do with the kids while at summer camp!
Grow your own caterpillars at camp and watch them turn into butterflies!

How to do this activity
A. Materials you need
- insect lore butterfly kit
B. Set-up
Buy the caterpillar set.
C. Activity
Once the kit arrives, take the caterpillars out and follow the directions on how to set them in a safe place.
Watch them grow! They grow quickly! Once they form their chrysalis, they can be moved into the butterfly container.
They have specific directions on how to do all of this! Adults will move them to keep them safe.
Wait and watch for them to hatch! Once they are all hatched, release them. So amazing to watch the whole process, and a great learning opportunity.
#24: Capture the Flag
Looking for an awesome summer camp game? This game is PERFECT for kids to do outside!
They won’t want to stop playing. Plus, this is a great one for the camp counselors to get involved with.
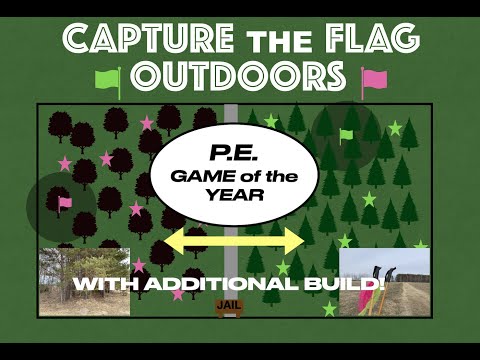
How to do this activity
A. Materials you need
- flags
- jerseys

B. Set-up
Set a center line where if kids cross the line, they can get tagged by the other team. You can also set up a “jail” spot where tagged kids need to go. This is optional, or you can make a more easy way for kids to get back in (check below).
Also, split up teams evenly.
C. Activity
Each team will work together to create their own forts where their team’s flag will hide (3-4 minutes to complete this task!)
On the GO signal, students can cross the middle line to try to get the other team’s flag.
If they get tagged by someone on the other team, they must do 10 push-ups before entering back into the game, and they must go back to their side.
If a student gets the flag and is on their way back with it and gets tagged, they must drop the flag where they got tagged.
The team can’t pick the flag back up; it stays where they were able to run it to.
If a team successfully grabs a flag, that round is over, and you will play again!
#25: Free Summer Color by Codes
This color-by-code summer camp art worksheets is a fun way for kids to work on numbers! There are 7 FREE coloring pages included in this pack.
My son loves the color-by-code printables SO much! They are by far his favorite learning activity.

How to do this activity
A. Materials you need
- Color by Code sheets
- crayons
- markers
Click HERE for your FREE Summer Color by Code
B. Set-up
Print off the sheets that you want to use!
C. Activity
Make sure your child understands how to read the key at the top of the page. Then, they will color each number in the picture based on what the key says.
These are my kid’s favorite out of all the printables I create. They love revealing the picture at the end!
RELATED: Math Printables
#26: DIY Washable Window Paints
This is a great summer camp art activity! Kids will love painting on the windows. Make your own washable window paints!
I promise it washes off too!

How to do this activity
A. Materials you need
- dish soap
- washable paint
- muffin tin
- flour
B. Set-up
Add about 4-5 tablespoons of dish soap to each compartment of the muffin tin. Then, dump in 3-4 tablespoons of washable paint. Lastly, mix in a little bit of flour to each one to get your desired consistency.
C. Activity
I used a straw to mix up the paints, this was an easy way to mix them without spilling over to the other colored paints.
Take it outside and let the kids use paintbrushes to paint on the windows! They can get creative and draw pictures or just explore the paints by color mixing and making their own designs.
Once they are all done, spray off the window using a hose. We did this immediately after we were done, I would suggest doing this to ensure that it comes off.
This is the perfect summer art activity for kids!
#27: Paper Plate Flag Craft
Creating a flag is the PERFECT summer camp art project for July 4th. We love using paper plates for crafting because it’s so simple.
What is fun about this craft is that we used streamers! This is a beautiful flag craft to hang up at home.

How to do this activity
A. Materials you need
- paper plate
- tape
- streamer
- acrylic paint
- paintbrush
- sponge

B. Set-up
Cut a paper plate in half and paint it blue using acrylic paint! Let this dry; it’ll take about a half-hour to dry.
C. Activity
Cut red and white streamers. They should be about the same length!
Once the paper plate is dry, the kids can tape the steamers onto the back of the paper plate. They should alternate the colors of the steamers.
Lastly, create a star shape on a sponge. Then, cut it out and dip it into the paint. The kids will make star prints on top of the blue paint!
This is a cute and easy Fourth of July craft for toddlers and preschoolers.
RELATED: July 4th Crafts
#28: Father’s Day Salt Dough Craft
Father’s Day is in the summer, so making a craft for dad is a great summer camp art project!
I love that this craft has the kid’s handprint in it as well as a photo.

How to do this activity
A. Materials you need
- plain flour
- salt
- water
- bowl
- baking sheets
- acrylic paint
- mod podge
- pictures
B. Set-up
To make salt dough, in a bowl, mix 2 cups flour, 1 cup salt, and 1 cup water. If you need it, add a little bit more water; sometimes, I have to do that to make it the exact consistency I want.
Preheat the oven to 250.
C. Activity
Use a rolling pin to roll the dough out onto a baking sheet. Then, have your child place their hand in the dough.
Press their hand down so the print shows up. Then, use a knife to cut around the handprint.
If you want to add a photo, use a circle or heart cookie cutter and make the shake in the bottom of the handprint.
Place in the oven at 250 degrees for 2 hours. Pull it out and let it cool.
Once it’s cool, the kids can use acrylic paint to paint their handprints! Once the paint is dry, you can use a little bit of mod podge to stick the photo onto the back of the handprint.
Keep the handprint flipped upside down so it can dry with the photo in place.
RELATED: Father’s Day Crafts
#29: Stained Glass Window
Need a rainy day summer camp art project?
This is a great summer craft to do on a day when the kids need to get out of the sun for a bit.

How to do this activity
A. Materials you need
- washable paint
- masking tape
- dish soap
- water
- paintbrushes

B. Set-up
Use masking tape to make your design on the windows!

C. Activity
Make the stained glass window paint by mixing washable paint, a splash of dish soap, and a splash of water in a muffin tray.
I did not measure exact amounts, just make sure not to add too much water, or it will be too drippy.
Paint the window using a paintbrush! You may need a few layers of paint to get it to look the way you want.
Slowly peel off the tape to reveal what your stained glass window looks like!
Use window cleaner to get the paint off your window.
#30: Rocking Sailboat Craft
Making a boat craft is the perfect summer camp art project for kids!
Making these sailboats are SO fun, and it’s a simple project that the kids can play with after creating.

How to do this activity
A. Materials you need
- paper plate
- do-a-dot markers
- acrylic paint
- popsicle sticks
- hot glue

B. Set-up
Fold a paper plate in half. Then, have the kids create the bottom of the boat by using paint, do-a-dot markers, or other art supplies you have on hand!
C. Activity
Hot glue a popsicle stick to the back of the paper plate. Then, create a triangle shape on a piece of paper.
Have the kids decorate the boat’s sail using those different art supplies! They can create dots, stripes, or small designs!
Once it’s all dry, stand the boat up and rock it back and forth! This will be so fun for the kids to see and play with!
RELATED: Fun Activities for Toddlers
#31: Leaf Prints
This is a must-try summer camp art project to do with the kids. The prints turn out absolutely beautiful!
Your kids will love searching for leaves outside for this project. Have them look for different shapes and sizes of leaves.

How to do this activity
A. Materials you need
- leaves
- washable paint
- cardstock paper
- art tray
- paint tray
- paintbrush

B. Set-up
Grab some leaves from outside! Try to search for leaves that don’t have any holes in them. This will make the prints turn out the best.

C. Activity
The kids will paint the leaves. They can use whatever colors they like. We chose to use rainbow colors!
They will paint the side of the leaf with the ridges so they show up on the paper.
Flip the leaf over and make sure to press down on the entire leaf to make the whole print show up. Slowly lift it up to make sure it doesn’t get smudged.
Check out your amazing leaf prints! This is such a beautiful leaf craft.
RELATED: Leaf Crafts for Kids
Final Thoughts and Conclusion
I hope you found some summer camp art projects and activities that you can use throughout the summer!
I loved being a camp counselor for many years! These ideas were such a hit!
Happy Crafting!
Deena


