15 EASY Kids Science Experiments (2026)
Looking for some easy kids’ science experiments?
I have 15+ easy and fun science experiment ideas that you can try at home or in the classroom!
Your kids are about to be AMAZED by these ideas. Let’s get started.
#1: Lava Lamp Experiment
Lava lamp experiments are our favorite easy kid’s science experiment.
We have done a bunch of variations of lava lamp experiments for holidays and seasons but the rainbow lava lamps are my favorite.

How to do this activity
A. Materials you need
- cups/sensory bottles
- Alka Seltzer tablets
- food coloring
- baby oil/vegetable oil
- water

B. Set-up
Fill the sensory bottles or jars up 1/2 way with baby oil. We used baby oil for this specific experiment because you can see the colors more clear. You can use vegetable oil and it will work the same way.
Add 1/4 cup of water on top of the oil.

C. Activity
Drop in a few drops of food coloring into each of the bottles. Lastly, have the kids drop in an Alka Seltzer tablet.
Prepare to be amazed! A few seconds later, you will see the mixture begin to bubble and start to look like a lava lamp!
This reaction will go on for a few minutes. You can continue this experiment by adding another tablet and it will keep going!
#2: Oil and Water
The classic simple oil and water kid’s science experiment is such a hit!
I love that you need just a few items that are in your pantry to do this experiment.

How to do this activity
A. Materials you need
- tray (we used a baking tray)
- vegetable oil
- food coloring
- water
- cups
- droppers

B. Set-up
Pour vegetable oil into a baking tray. Then, in small cups, make a mixture of water and food coloring.
C. Activity
The kids can use fine motor droppers (we love ours from Learning Resources) or medicine droppers that you may have at home.
They will suck up the water/food coloring mixture and squirt it into the oil. They will immediately see that the oil and water do not mix!
What happens?
Oil molecules are attached to other oil molecules and water molecules are only attracted to water molecules. This is why the oil and water don’t mix together! The oil floats on top of the water because the oil is less dense than the water.
RELATED: Fine Motor Activities for Kids
#3: Rain Cloud in a Jar
This is such a simple experiment to try at home with your kids. This spring activity for kids is perfect because it rains a ton!
The colors flowing through shaving cream are super cool! Check out the video below to see it in action!

How to do this activity
A. Materials you need
- jar
- blue food coloring
- water
- foam shaving cream
- droppers
- art tray
B. Set-up
Fill a jar up 3/4 of the way full with water. Then, add foam shaving cream at the top of it.

C. Activity
Add some blue food coloring to the top of the shaving cream, and squirt it in different spots. Then, watch how it flows through the water at the bottom! It’s amazing to watch.
Talk about different types of weather while doing this experiment. You can talk about rain clouds and what they look like.
RELATED: Spring Activities for Kids
#4: Dancing Orbeez
Have you ever played with Orbeez before? They are an amazing sensory filler for both kids and adults!
This is a fun way to play with Orbeez in a different way. It’s the perfect kid’s science experiment.

How to do this activity
A. Materials you need
- jar
- Orbeez
- Alka Seltzer tablet
- water
- bowl

B. Set-up
When you first get Orbeez, they are very tiny marbles. Add these marbles into a bowl or tray and add water.
Let it sit for 2 hours and watch how much they grow! It’s really cool to see.
C. Activity
Add water to a jar. Dump in some Orbeez and watch them sink to the bottom of the jar.
Add an Alka Seltzer tablet and watch the Orbeez dance! They will move up and down. This experiment will last for a few minutes. Add in another tablet to watch it again!
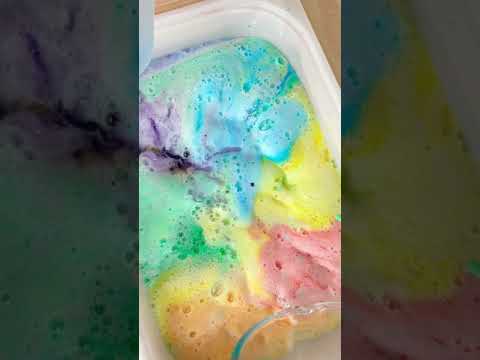
#5: Rainbow in a Jar
This kid’s science experiment is similar to the rain cloud in a jar, but this time we are going to make rainbows!
I love this one even more than the rain cloud experiment because you get to use all the colors of the rainbow

How to do this activity
A. Materials you need
- jar
- food coloring
- droppers
- cups
- water
- foam shaving cream
B. Set-up
Fill up the jar almost all the way up! Top it off with foam shaving cream for the cloud.
In cups, mix water and a few drops of food coloring.
C. Activity
The kids will use droppers to drop in the colors of the rainbow in order on top of the shaving cream.
Watch the colors go through the shaving cream and into the water! It’s really cool to see the colors show up in the water.
RELATED: Spring Crafts for Kids
#6: Lemon Volcanoes
One of our favorite go-to kid’s science experiments is fizzy play! No matter how many times we do this experiment, it’s always a hit!
The kids love watching the eruptions made by the vinegar being added into play!
How to do this activity
A. Materials you need
- lemons
- knife (adults will use)
- sensory bin
- baking soda
- dish soap
- vinegar
- food coloring
- popsicle sticks

B. Set-up
Cut the ends off both sides of the lemons. Then, cut the lemon in half! Stick a popsicle stick inside and around the lemon!
C. Activity
Drop a few drops of food coloring in each lemon. We chose to do rainbow colors! Add a few drops of dish soap and 1/4 cup of baking soda to each lemon.
Then, push it down in the lemon by using a popsicle stick! Lastly, add on the vinegar using a measuring cup or squirt bottles!
Watch the eruption occur! Your kids will be AMAZED and love the colors that come out of these lemons.
RELATED: Summer Activities for Kids
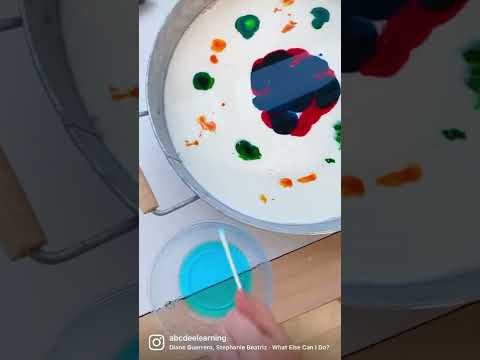
#7: Magic Milk
Magic milk is an easy experiment that will WOW your kids!
This is a colorful kid’s science experiment that only needs a few supplies that you have right at home!
How to do this activity
A. Materials you need
- whole milk
- food coloring
- dish soap (Dawn dish soap)
- Q-tips
- tray
B. Set-up
Pour whole milk into a tray! Add a few drops of food coloring. For this specific experiment, I recommend using the McCormick brand of food coloring. It seems to work the best. I have had trouble with gel food coloring for this experiment.
You can use one color or multiple colors!
C. Activity
Have the kids dip a Q-tip into dish soap and lightly touch one of the globs of food coloring. See it spread out REALLY quickly across the tray.
Do this with all the drops to see the colors move all around the milk!
RELATED: Easy Toddler Activities
#8: M&M Experiment
The Skittles science experiment is a classic that is perfect for kids of all ages! Even adults love this one, it never gets old.
We have done different versions of the Skittles experiment for each holiday.

How to do this activity
A. Materials you need
- white plate
- Skittles or M&M’s
- water
- droppers
B. Set-up
On a white plate, place the Skittles or M&M’s in a circle. I am showing you our Valentine’s Day experiment so we put the colors in a pattern so it was the same all around.
C. Activity
Fill a cup with water and use droppers to drop water all around the center of the candies. The water needs to touch all of the M&M’s or Skittles for this experiment to work correctly.
You can also use a measuring cup with water, just make sure to pour it out slowly.
Watch the magic happen! The colors will slowly start moving off of the candy and into the middle. It takes about 5 minutes for it to be complete!
RELATED: Valentine’s Day Crafts and Activities for Kids
#9: Fizzy Ice
The fizzy ice science experiment is simple to put together and the kids love watching the ice fizz!
This is a great experiment to do in the winter or summertime!

How to do this activity
A. Materials you need
- sensory bin
- ice tray
- water
- baking soda
- food coloring
- droppers/squirt bottles
- vinegar
B. Set-up
Add water to all the compartments of the tray and freeze them for a few hours. We used 3 ice trays to have a bunch of ice!
C. Activity
Dump the ice into a sensory bin and add food coloring all around the ice. We used rainbow colors but you can also theme this for a holiday.
Then, sprinkle baking soda all around the ice. Then, have the kids use droppers or squirt bottles to squirt vinegar on top of the ice.
Watch the ice fizz up! The colors look so cool on the ice when they fizz.
#10: Elephant Toothpaste
My kids LOVE the elephant toothpaste science experiment. The reaction is super cool and unlike any other experiment we have done.
It’s a simple experiment that you can do with ingredients you already have in your pantry!

How to do this activity
A. Materials you need
- water bottles
- dry yeast
- warm water
- dish soap
- 3% hydrogen peroxide
- measuring cups/spoons
- safety glasses
- sensory bin
- food coloring
B. Set-up
Put safety glasses on because hydrogen peroxide can irritate your eyes.
Add 1/2 cup of hydrogen peroxide to the water bottle(s). Then, add 1 tablespoon of dish soap into the bottle along with whatever color food coloring you want to use and swirl it around.
In a bowl, add 1 tablespoon of dry yeast and 3 tablespoons of warm water. Mix this together using a spoon.
Add the water bottles into a sensory bin to contain the mess. Then, slowly add the yeast mixture into the water bottles and watch the reaction!
You can use a funnel or a measuring cup to add the yeast mixture into the bottles to make it a little easier for the kids to pour!
#11: Fizzy Dinosaur Experiment
One of my favorite science experiments that we have ever done is this fizzy dinosaur volcano experiment.
I think it’s by far my kid’s favorite as well. They played with this set-up for about an hour! They always love including their toys in experiments.

How to do this activity
A. Materials you need
- baking soda
- droppers
- vinegar
- dinosaur toys
- tray
- food coloring
- cups
- color chemistry set

B. Set- up
Dump an entire box of baking soda in a tray!
Make a volcano by using the clay that’s provided in the set. Place it around the beaker and paint it with the food dye provided or use your own at home! Inside the beaker, add a little baking soda!
Fill up plastic cups with vinegar and add a few drops of food coloring (red, orange, and yellow for the lava).
C. Activity
Add dinosaurs into the tray so they can play along with the figures during the experiment.
The kids will use droppers to move the vinegar-colored mix into the baking soda to see it fizz! This will go on for a long time since the whole tray is filled up!
Have them drop vinegar inside the volcano to see it explode!
RELATED: Dinosaur Activities for Kids
#12: Magic Sand Experiment
Want to WOW your kids? Magic sand is such a cool science experiment! I can’t believe this can even happen.
All you need is the magic sand, water, and a jar!

How to do this activity
A. Materials you need
- magic sand
- water
- jar
- spoon

B. Set-up
Grab your materials and get them ready! The kids can choose their favorite color of sand to use. We mixed two colors together for this experiment.
C. Activity
Fill a jar up 3/4 of the way full with water. Then, have the kids dump the sand into the water. You can use a measuring cup and slowly add it in.
See how the sand looks underwater! The way it twists is really neat. Then, use a spoon and lift it up out of the water.
It’s dry! How amazing is that?
You can reuse this sand, just dump the water out of the jar and let the sand dry on a tray.
#13: Rising Water
The rising water experiment is cool to watch! My kids were amazing what happens during this simple science experiment.
Adults will need to help with this experiment since it’s dealing with a candle and lighter.

How to do this activity
A. Materials you need
- white tray/plate
- clear jar or science flask
- candle
- play dough
- lighter
- food coloring
- water
- measuring cup
B. Set-up
Have the kids pour water onto the bottom of the tray or plate. They can add food coloring, but this is optional.
C. Activity
Stick a piece of play dough onto the bottom of a candle and place it in the middle of the tray/plate.
The adult will light the candle using a lighter. Then, place a clear jar over the candle.
Watch what happens! The light will dim on the candle and the water will rise inside of the jar.
How cool is that?!
#14: Dancing Rice
This science experiment is simple, fun, and mesmerizing!
When the rice dances, it looks like a snowstorm! It’s so neat to watch the rice move throughout the jar.
How to do this activity
A. Materials you need
- jar
- food coloring
- instant rice
- measuring cups
- baking soda
- vinegar

B. Set-up
Fill a jar halfway full with water. Then, if you want to, you can add food coloring (we chose blue).
Dump in 1 tablespoon of baking soda, 1/4 cup of instant rice, and 1/3 cup of vinegar.
Watch the reaction! You will see the rice dance all around the jar. These experiment can be done again, just add more baking soda and vinegar.
You must use instant rice for this activity. The other types of rice are too dense and won’t dance.
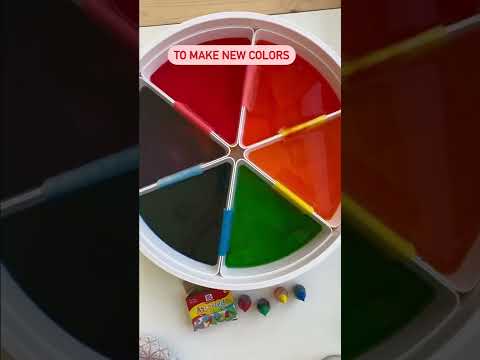
#15: Baking Soda Tray
As you can see, we love fizzy science experiments. They never get old, the kids always enjoy them and they are super simple to set up!
This one is great for beginners and younger kids who are just starting to explore science.

How to do this activity
A. Materials you need
- tray
- baking soda
- food coloring
- vinegar
- droppers
- cups
B. Set-up
We grabbed 6 cups and added the food coloring (each color of the rainbow) to the cups. Add in some vinegar to the cups and use a spoon to mix.
C. Activity
Dump baking soda onto the tray. Then, have the kids use droppers to squeeze up the colored liquid and squirt it onto the baking soda!
They will love the reaction it creates! It’s fun to explore the colors and how they mix together to make new colors. At the end of the experiment, I added one of the cups in the middle and they made volcanoes with baking soda and vinegar!
#16: Hidden Colors Experiment
Here’s a spin on #15’s experiment that is fun and different.
Create a mystery color science experiment with the same materials you just used! All you need to do is swap out the tray for a muffin tin.

How to do this activity
A. Materials you need
- muffin tin
- food coloring
- baking soda
- vinegar
- droppers
B. Set-up
Add drops of food coloring to the bottom of each section of the muffin tin. Then, cover it up with baking soda.
C. Activity
Fill a cup up with vinegar and have the kids use droppers to suck up the vinegar and squirt into each section.
They will love seeing what colors are hiding in each part of the muffin tin! Once they reveal all of the colors, they can color mix and experiment what new colors they can make.
I added the muffin tin on top of my sensory bin to control any mess it would create. This is also a good one to take outside!
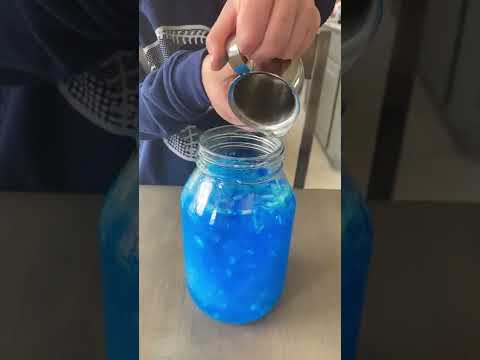
#17: Snowstorm in a Jar
This science experiment is PERFECT for winter and Christmas time. Whether or not you get snow around you, this is a fun experiment.
Watching the snow move around jar is fascinating!

How to do this activity
A. Materials you need
- jar
- acrylic paint
- baby oil
- Alka Seltzer tablet

B. Set-up
Fill a clear jar up 3/4 full of baby oil. Then, in cups add 1/3 cup of water and a few squirts of blue and white acrylic paint. Mix together with a spoon.
C. Activity
Have the kids add the acrylic paint mixture to the baby oil. Then, break up an Alka Seltzer tablet and add it in.
The paint will start dancing around the jar looking like a snowstorm in a jar!
RELATED: Winter Crafts and Activities
#18: Walking Water Experiment
I love when experiments are easy but educational at the same time!
The walking water experiment is a great summer activity because the kids get to work with water. They will also learn about how colors mix to make new colors.

How to do this activity
A. Materials you need
- cups/tray/muffin tray
- paper towels
- water
- food coloring
B. Set-up
We used our play tray from Inspire My Play. However, you can do this experiment using 6 clear cups or even a muffin tray!
Add water to all of the cups or slots of the tray. If you are using cups, make them into a circle formation.
C. Activity
In the first slot or cup add red food coloring, in the third add yellow, and in the fifth add blue.
Fold one piece of a paper towel in half and cut off 1/3 of it. Place one end in the red and one end in the clear water. Do this for each of the colors. There should be two ends in each of the cups or slots of the tray.
Wait to see the colors move through the water! This process takes about a half-hour to happen.
Have the kids form a hypothesis to see what they think is going to happen. Talk about what colors mix to make new colors!
#19: Color Changing Flower Experiment
Want to wow your kids?! This is a fun spring science activity.
It also makes for the prettiest DIY home decor around the house!

How to do this activity
A. Materials you need
- white flowers
- cups
- food coloring
- water
B. Set-up
Cut some white flowers from the outside!

C. Activity
Add a half cup of water to the cups and add a bunch of food coloring to each one. I added probably about 20-30 drops. The more you add the better results you will get.
We used the colors red, orange, yellow, green, and blue. I have tried this experiment before with purple and it doesn’t work.
Place a white flower in each cup. Let them sit in the cups for 24 hours. Check the progress every few hours to see the changes!
Once 24 hours is up, see how much the flowers have changed! This is a fun and easy experiment for kids!
RELATED: Spring Crafts and Activities for Kids
Final Thoughts and Conclusion
I hope you were able to find some science experiments for kids that you can try at home or in the classroom!
These activities are fun and easy for adults to set up and for kids to learn and play with.
Happy Learning!
Deena


