63 FUN Christmas Crafts for Preschoolers (2026)
Looking for some fun Christmas crafts with preschoolers?
Planning fun activities for your little ones to do will make it even more wonderful! In this article, you will find 63 FUN Preschool Christmas Crafts that are unique, fun, and easy!
Let’s get started with the magic!
#1: Reindeer Paper Craft
I have been loving paper crafts lately! They are simple to throw together and easy for the kids to do.
This is the perfect Christmas craft with preschoolers to try!

How to do this activity
A. Materials you need
- construction paper
- white paper
- washable paint
- googly eyes
- glue stick
- glue
- scissors

B. Set-up
Create a reindeer head and antlers! Then, paste it to a piece of white paper.
Also, make the reindeer’s nose and add on googly eyes to complete the reindeer’s face!
C. Activity
The kids will dip their fingers in paint and make prints all through the antlers!
Once these prints are dry, they can use a black marker to create lines throughout the antlers, so they look like Christmas lights!
#2: Christmas Tree Noodle Craft
Sensory fillers like pasta and rice can also be used to create the best crafts!
These Christmas trees came out so cute! It’s a must try Christmas craft with preschoolers.

How to do this activity
A. Materials you need
- bow tie pasta noodles
- poms
- acrylic paint
- ziplock bag
- art tray
- cardboard
- glue
- hot glue
- parchment paper
- stars

B. Set-up
Paint the pasta noodle individually, or you can place them in a ziplock bag, add some acrylic paint and shake it up!
Dump out the noodles on an art tray and let them dry. You may need to use a paintbrush and get the spots where the paint didn’t reach!
Lastly, on a piece of cardboard, paint a Christmas tree!
C. Activity
Once the pasta noodles are dry, have the kids use glue to glue them on top of the tree, you painted on the cardboard. Regular glue will work for this part!
When all the noodles are in place, you can hot glue some poms to the tree to be the ornaments. I suggest using hot glue for that step; that way, you know it’ll stay on. Sometimes if you use regular glue for projects like this with poms, they can fall off.
RELATED: 40 Sensory Activities for Kids
#3: Fork-Printed Christmas Trees
Fork printing projects are SO fun! The marks that the fork leaves are perfect to create Christmas trees!
This Christmas craft with preschoolers is the perfect addition to a holiday party.

How to do this activity
A. Materials you need
- forks
- washable paint
- markers
- glitter glue
- paper
- stars

B. Set-up
Add some green paint to a paint tray!
Draw and color in a tree trunk at the bottom of the paper with a brown marker. Lastly, draw a tree online in pencil, so your child knows where to place the forks to create a tree shape!
C. Activity
The kids will dip the fork into the green paint and make prints to cover the entire tree!
They can add on some glitter glue dots to be the ornaments. Lastly, they can add on a sticker star at the end!
#4: Christmas Sweater Activity
Who doesn’t love a good Christmas sweater during the holiday season?
This Christmas craft with preschoolers is AMAZING because kids can make them as silly as they want! Christmas sweaters are supposed to be funny!

How to do this activity
A. Materials you need
- cardstock paper
- paint
- buttons
- craft lights
- Q-tips
- mini bows
- poms
- glue stick
- glue
- scissors
- play tray

B. Set-up
Create some sweater shapes on paper and cut them out!
If you want to include any main characters (reindeer, Santa hat, or candy cane), you can make these and cut them out too. These are optional!
C. Activity
Put all the items for the kids to choose from in a tray. I find this the easiest way for them to grab and create!
They can use stickers to stick objects on or a little glue to put items on each sweater!
#5: Gingerbread House Craft
Sometimes building real gingerbread houses stress me out. But, this version of a gingerbread house wasn’t like that at all!
This paper gingerbread house is a great Christmas craft with preschoolers to work on shapes.

How to do this activity
A. Materials you need
B. Set-up
You will need to draw some shapes for the kids to create this fun gingerbread house! I made a square for the home, a triangle for the roof, and a rectangle for the chimney.
Then, I created shapes for windows, made peppermints, gumdrops, and candy canes! If your little one is old enough to create and make these on their own, by all means, have them go for it!
C. Activity
Let the kids create their own house using the pieces that you made! Then, they can use a glue stick to paste all the items on! We used blue paper as the background, and they fingerprinted some snow.
RELATED: Shape Activities for Preschoolers
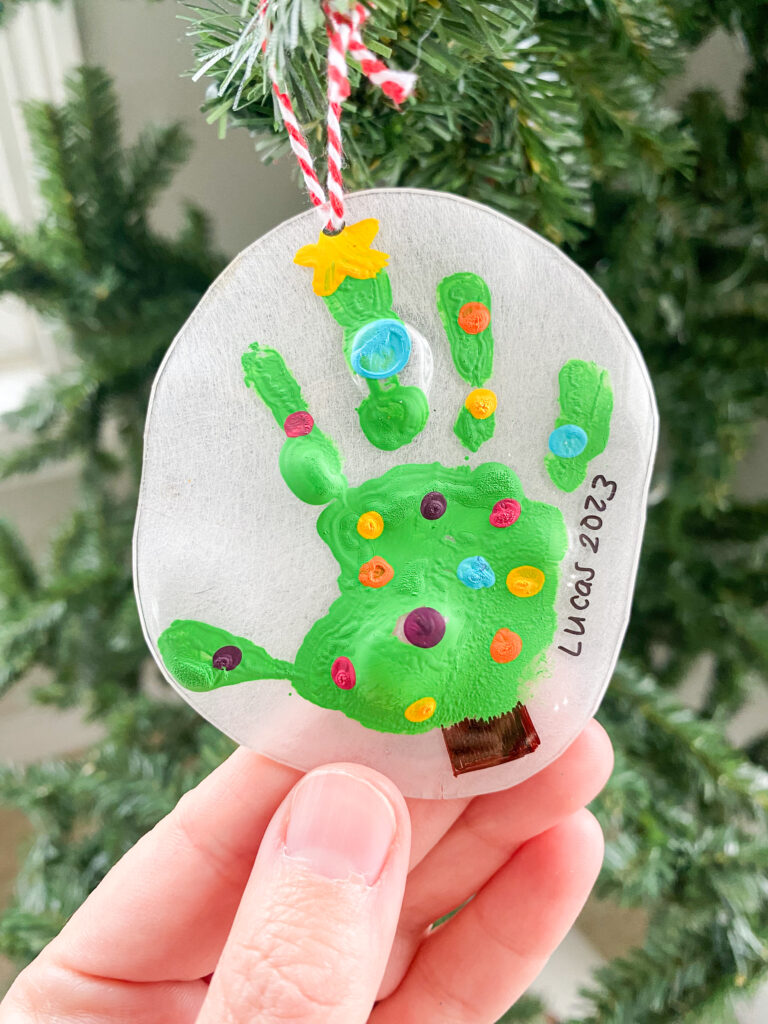
#6: DIY Christmas Ornamnents
These ornaments are the perfect Christmas crafts with preschoolers! These are adorable and easy to make!
I have three fun ideas for you, watch the video below to see them all.

How to do this activity
A. Materials you need
- clear ornaments
- poms
- hot glue
- scrapbook paper
- googly eyes
- buttons
- Sharpie
- pipe cleaners
- star sticker

B. Set-up
Push colored poms into each of the ornaments. We used brown, white, and green poms!

C. Activity
We made a reindeer by creating antlers out of scrapbook brown sparkly paper. You will need to hot glue these to the top of the ornament.
Then, add googly eyes, a red pom for the nose, and a smile!
For the snowman, add googly eyes, buttons, and a carrot nose. Lastly, hot glue two poms on the side of the ornament and stick a pipe cleaner on top to look like ear muffs.
Lastly, to make the tree, glue buttons around the ornament to look like lights on a tree. Connect them all using a black Sharpie!
RELATED: Winter Crafts for Kids
#7: Pine Cone Tree Craft
Have you ever tried to craft with pine cones? You won’t regret trying this Christmas craft with preschoolers.
Pine cones make the perfect little Christmas trees! I love these can work for decor around the house as well!

How to do this activity
A. Materials you need
- pine cones
- acrylic paint
- buttons
- stars
- glitter
- glue
- poms
- hot glue
- wood circle ornaments

B. Set-up
Use acrylic paint to paint the pine cones! We did some green ones and a white one!
C. Activity
Hot glue the pine cone to a wood ornament once the paint is dry!
Add on buttons, poms, or glitter! I just used regular glue to add on the glitter and buttons! You can just stick in the poms, and they will stay there!
This is such a fun Christmas activity for kids! So simple and a fun way to use objects in nature to craft!
#8: Christmas Tree Threading
This is a great Christmas craft for preschoolers to build their fine motor skills!
It’s really fun and easy to make. I love the outcome of this project.

How to do this activity
A. Materials you need
- paper plate
- acrylic paint
- yarn
- one hole punch
- scissors
- craft poms
- glue
- star sticker
B. Set-up
Paint your plate the color you want! We love using acrylic paint because of the color choices. You have to let the paint dry to continue, but with acrylic paint, it takes about a half hour!

C. Activity
Draw a triangle shape on the back of the plate, the cut it out with scissors!
Go around the entire triangle shape and punch a hole using a hole punch.
Cut a bunch of different green yarn strips. Then, the kids will tape one side of the yarn on the back of the plate and thread it through the front and back.
Tape the other side on the back when done with with string, then continue with another.
Once you have all your threading done, glue on small craft poms to the font, add a tree trunk with cardstock paper and a star sticker!
#9: Christmas Mug Gift
Looking for a fun DIY gift to make someone special this year? This Christmas craft for preschoolers is PERFECT.
It’s an adorable keepsake, plus it is functional! I love gifts that I can use.
How to do this activity
A. Materials you need
B. Set-up
Paint your child’s hand with green acrylic paint and have them place their hand on the mug. Slowly remove it so it doesn’t smear.
Let the handprint completely dry before adding on the fingerprint ornaments.
C. Activity
Once dry, the kids can make fingerprint ornaments on the tree and paint a star at the top.
Let this dry again. Preheat the oven to 350 degrees F. Once it is dry, you’ll let the mug bake on a baking sheet for 30 minutes.
This will make your mug dishwasher safe so it doesn’t remove the paint.
*If you want to add Sharpie, it must be an oil oil-based Sharpie, or it’ll smear. I made this mistake!*
It is also optional to spray a thin coat of clear acrylic paint sealer on top AFTER baking. This isn’t a must- but it will make sure your painting doesn’t come off.
Do not spray the sealer on your mug if you use Sharpie- just stick with the baking!
What a cute DIY Christmas gift!
#10: Candy Cane Craft
Make these candy canes for a great Christmas craft with preschoolers.
Plus, it’s super easy to pull off too. If you are looking for a quick and easy preschool Christmas craft, this one is for you.

How to do this activity
A. Materials you need
B. Set-up
Create a candy cane shape out of paper. We used both red and white paper. Then, paste the candy cane onto another sheet of paper.
Dump some white and red paint into a paint tray.
C. Activity
Have the kids place a craft pom inside a clothespin so it’s easy to dab into the paint. Then, have them create stripes on the candy cane with the pom! That’s it, such an easy and fun Christmas activity.
#11: Christmas Color by Code
What’s better than FREE around the holidays? Nothing, right?
My Christmas color-by-code activity is fun, and it’s a great way to get preschoolers working on numbers!

How to do this activity
A. Materials you need
- crayons
- markers
- Christmas color by code
Click HERE for your Christmas Color by Code Printable.
B. Set-up
Print out the pages and grab your coloring supplies!
C. Activity
Have your kids use the color key at the top of the page to color in the picture. They can tell you the number and the color. See if they can find all the numbers on the sheet and color them the correct color!
RELATED: Holiday Resources
#12: Candy Cane Counting
Here’s nother adorable candy cane activity! It’s a great Christmas craft with preschoolers to work on counting skills.
I thought it would be fun to create a play and learn craft that worked on some gluing skills! My little guy just loves anything dealing with glue.

How to do this activity
A. Materials you need
- easel paper
- cardstock paper
- scissors
- glue stick
- markers
- Sharpie
- Christmas tags

B. Set-up
Draw a bunch of candy canes on the easel paper! Then, cut strips of different colored construction paper to fit on the candy canes. By drawing, write a number next to it!
C. Activity
Your children will use the strips you cut out to paste onto each candy cane you drew. They should look at the number near the candy cane to know how many strips to put on each one.
RELATED: How to Teach your Toddler Numbers
#13: Christmas Tree Handprint Art
I am such a sucker for handprint art. How cute is this Christmas craft with preschoolers?
There are so many fun little holiday art supplies that kids can use to decorate the trees!

How to do this activity
A. Materials you need
B. Set-up
Trace your child’s hand on green paper. Tip: I place multiple sheets under, so I just have to cut it out once.
Create tree trunks out of brown paper and paste them on the hands at the bottom.
C. Activity
Have your little ones glue on some fun Christmas-themed supplies! They can fingerprint some ornaments on or glue on some buttons or poms!
Hang this up and keep it for years to come. Looking back at their handprints is so cute. It’s such a great memory to keep!
#14: TP Roll Christmas Crafts
Toilet paper roll crafts are really fun, and they always turn out super cute.
The best thing about them, too, is that you ALWAYS have them on hand! So all you need is a few craft supplies, and you are set.

How to do this activity
A. Materials you need
- TP rolls
- white, green, and brown acrylic paint
- googly eyes
- mini bow
- craft lights (hobby lobby)
- pom-poms
- pipe cleaners
- buttons

B. Set-up
Paint one TP roll green, one brown, and one white.

C. Activity
a. Snowman– To create the face, glue googly eyes on, cut out a small orange triangle from cardstock for a nose, and draw in a smile with a Sharpie. Add on some buttons and wrap a pipe cleaner around its neck for a scarf. Lastly, hot glue a pipe cleaner to the top of the roll and two poms for ear warmers.
b. Reindeer– Glue on googly eyes and red paper for the nose. Use brown paper to create antlers and make fingerprint ornaments on them!
c. Tree– Draw a tree shape on the roll. Make sure to leave space at the bottom, so it’ll stand up! Cut out the sides of the tree and paint it. Add on Q-tip painted ornaments!
#15: Santa Beard Cutting Craft
This is a great Christmas craft with preschoolers to practice cutting skills!
Plus, it’s just cute and fun for the kids to do. They will love cutting Santa’s beard.

How to do this activity
A. Materials you need
- paper
- scissors
- glue stick
- googly eyes
- glue
- paint
- poms
- markers

B. Set-up
Create some Santa faces using paper! Then, place the face on top of a white piece of paper so you can see how long you should make the beards.
Make the beards and attach them to the face using a glue stick. Draw lines (straight, zig-zag, curvy, etc.) on each beard.
Make Santa’s hat using red paper and glue on a pom at the end of each hat!
C. Activity
Have the kids try their best to cut along the lines to cut Santa’s beard! What a fun craft activity and craft for kids!
#16: Hot Chocolate Craft
There’s nothing like a cup of hot chocolate on a cold winter day, right?
This Christmas activity for kids is PERFECT because it involves a little treat!

How to do this activity
A. Materials you need
B. Set-up
On a piece of cardboard, draw and paint a coffee cup!
C. Activity
The kids can decorate the cups however they want. They can use stickers, gems, or any other fun Christmas-themed supplies you have at home.
They can create faces on the cups or just add designs! Lastly, they can add some mini marshmallows in the hot chocolate or even a candy cane!
#17: Gingerbread Making Craft
Tray play activities are wonderful for a Christmas craft with preschoolers.
Every time I set up a tray play craft activity, the kids will create at least 3 or more of them! It’s so cute how they want to come up with different ideas each time.

How to do this activity
A. Materials you need
- plastic tray
- googly eyes
- Christmas buttons
- Christmas lights (hobby lobby)
- red jingle bells
- glitter glue
- pipe cleaners
- the Gingerbread Man
- art tray/table cloth

B. Set-up
Create a tray or have separate bowls for different supplies. Make sure to have a way to put all the objects on with (glue or glitter glue).
C. Activity
Let the kids create their own gingerbread men! They can get as creative as they want by making fun designs and adding different items to their gingerbread men.
#18: Bowl with Frosty
Think your kids may get restless during the party doing a bunch of crafts? Snowman knockdown is a perfect way to keep the kiddos who love to be active happy!
This is a great way to work on rolling and aiming skills as well. Depending on how old your children are, you can make it as easy or as challenging as you want!

How to do this activity
A. Materials you need
- plastic cups
- Sharpie
- cardstock paper
- fake snowballs

B. Set-up
Create the snowman eyes and mouth using a Sharpie and cardstock paper for a nose! You can create 6 or 12!
C. Activity
Have your little one roll the fake snowball at the cups to try to knock them over! You can place a cone or some painter’s tape on the floor so they know where to start. They can start close and then back up if they need a challenge.
RELATED: ENTERTAINING Indoor Activities for Kids
#19: Paper Plate Christmas Crafts
It’s honestly amazing what you can do with a simple paper plate. The number of activities are endless!
These Christmas craft with preschoolers is easy and fun to create.

How to do this activity
A. Materials you need
- paper plates
- acrylic paint
- cardstock paper
- green yarn
- googly eyes
- glue
- cotton balls
- buttons
- mini bells
B. Set-up
We made a reindeer, Santa, and a snowman. For the reindeer, paint the plate brown, and for Santa, paint the top half beige.
C. Activity
While waiting for the paint to dry, you can create the snowman! Make a hat and scarf out of cardstock paper.
Paste the hat on the top and the scarf at the bottom. We added some fun colored bells that I linked above.
Glue on the googly eyes, make a carrot out of orange paper, draw on the mouth, and add buttons for the cheeks!
The reindeer needs two antlers made out of cardstock paper. Glue these on the back of the plate!
Then, add on googly eyes, a red paper nose, and buttons for cheeks. We added some colored lights we got from Hobby Lobby.
Lastly, for the Santa, add glue to the bottom of the plate and stick on cotton balls. You’ll also stick them on the sides of the face and the bottom of the red hat!
#20: Mini Canvas Gift
Here’s a cute DIY gift idea! This is a great craft for kids to make their parents, grandparents or teachers!
I love keepsake crafts like this that I can pull out each Christmas season.

How to do this activity
A. Materials you need
- mini canvases
- acrylic paint
- ribbon
- hot glue
- googly eyes
- poms
- pipe cleaner
B. Set-up
We made a few different versions of this craft. We made fingerprint reindeer, snowmen, a Christmas tree, a wreath, and a large snowman.
Depending on which one you want to make, you may want to paint the background and let it dry or you can just leave it white.

C. Activity
Make fingerprints on the canvases. You’ll have to let the fingerprints dry before adding on extras. Once they dry, you can add faces and other fun details!
Make this into an ornament by adding a ribbon to the back of the canvas to hang up. You’ll need hot glue for this.
Or, you can place it on the easel that comes with the small canvas!
#21: Paper Christmas Tree Craft
Looking for a simple Christmas craft with preschoolers? This is such a fun and cute one!
This Christmas tree was one of my son’s favorite projects that we have done!

How to do this activity
A. Materials you need
B. Set-up
Cut strips of paper that are different sizes. The kids will be organizing them on paper from longest to shortest!
C. Activity
The kids will paste on the strips of paper according to size to look like a tree! We used two colors of green paper. Once they are done, they can add a star on top and Christmas buttons for the ornaments!
#22: Reindeer Sponge Painting
I love using sponges for art projects! They can make so many different shapes and characters!
This Christmas craft for preschoolers is simple and quick activity for kids.

How to do this activity
A. Materials you need

B. Set-up
Create a circle shape on a sponge with a Sharpie and cut it out.
C. Activity
Dip the sponge into brown paint and make prints on white paper! Then, add googly eyes, hot glue a red pom in the middle to be the nose, and draw antlers on using a brown marker!
#23: Snowglobe Craft
You can’t forget about Frosty the Snowman on Christmas!
This Christmas craft with preschoolers is cute and fun. They will love making their own snowglobes.

How to do this activity
A. Materials you need
- cardstock paper
- scissors
- glue stick
- washable paint
- marker
- pipe cleaners
- buttons
- Q-tips
- paint tray
- glue
- snow confetti
B. Set-up
Create a circle shape out of blue paper and a base out of white paper. Use a glue stick to glue these parts together to make the globe.
Then, create a snowman shape out of white paper. Lastly, make a hat shape out of black paper!
C. Activity
Draw on some eyes, add a nose, mouth, buttons and use a pipe cleaner to be the scarf for the snowman!
Glue on the snowman towards the bottom of the blue area of the globe. Then, the kids can add snow to their globe by using Q-tips to dab on some snow or snow confetti!
Lastly, you can create some Christmas lights at the bottom of the globe by finger painting using washable paint!
#24: Christmas Tree Name Craft
This Christmas craft with preschoolers helps them learn the letters of their name.
Using a Q-tip to paint is one of our go-to activities! It’s an easy tool for the kids to use, and we always have them on hand.

How to do this activity
A. Materials you need
B. Set-up
Cut the number of triangles out that you need to make your child’s name. Also, cut a tree trunk out!
Have your little one write the letters of their name on the triangles, or you can do this part for them.
C. Activity
The kids will glue on the triangle pieces in the correct order to build their name. Then, they will add the tree trunk at the bottom!
They will use Q-tips and dip them in paint to create ornaments for their tree. We used red and green, but you can use as many colors as you’d like!
Lastly, add a star on top of the tree!
#25: Reindeer Paper Plate Craft
This reindeer paper plate craft is one of our ALL time favorite DIY Christmas crafts we have ever done!
I love when kids can play with the crafts afterward. They get more into creating when they know they can play with it when it’s done!

How to do this activity
A. Materials you need
B. Set-up
Paint a paper plate brown using acrylic paint. Once it’s dry, cut a hole at the top so the kids can see through!
C. Activity
Trace the kid’s hands-on brown construction paper and use hot glue to glue them to the top of the plate. These will be the reindeer’s antlers!
Glue a popsicle stick on the back of the plate so the kids can hold it up to be a mask! Lastly, hot glue a red pom in the center of the plate to be Rudolf’s nose!
#26: Gingerbread Paper Craft
This paper gingerbread craft is the cutest! The kids will love making the gingerbread outfits!
These cuties would go perfectly with craft number 5 that I shared up above.

How to do this activity
A. Materials you need
- paper
- washable paint
- Q-tips
- mini bows
- scissors
- glue stick
- mini bells
- buttons
- poms
- googly eyes
B. Set-up
Create gingerbread people out of brown paper and cut them out!
Make the outfits out of green and red paper. Then, measure up how big the gingerbread people are to know how big to make the clothes.
C. Activity
Make faces for each one adding googly eyes, checks, and a mouth!
Have the kids glue on their outfits add on some details like poms, bells, or even paint on them using Q-tips!
Lastly, make white squiggly lines on the head, arms, and legs to be the frosting to them. These turn out to be the cutest Christmas craft!
#27: Tree Cutting Cards
Do you like making homemade cards? These cards are EASY and fun!
It’s the perfect Christmas craft with preschoolers that they can do pretty much on their own.

How to do this activity
A. Materials you need
- white paper
- construction paper
- scissors
- glue stick
- glitter glue
- poms
- buttons
- glue
B. Set-up
Cut a white sheet of paper in half. Also, cut some triangles out of green and red paper (they need to be a few different sizes).
C. Activity
The kids will cut little slits at the bottom of each triangle. Once they are done with that, they will paste them from largest to smallest to make a tree.
They can flip up some of the edges to make them stand out a little bit! Then, the kids can add glitter glue, poms, or buttons to be the ornaments for the tree.
#28: Wreath Sensory Craft
This simple sensory craft is great for a Christmas craft with preschoolers that adults will love too.
Making these wreaths would be great at a holiday party.

How to do this activity
A. Materials you need
- white paper
- bow tie/ spiral noodles
- acrylic paint
- ziplock bag
- parchment paper
- art tray
- poms
- paintbrush
- glue
- hot glue
B. Set-up
Paint the pasta noodle individually, or you can place them in a ziplock bag, add some acrylic paint and shake it up!
Dump out the noodles on an art tray and let them dry. You may need to use a paintbrush and get the spots where the paint didn’t reach!
Lastly, on a piece of white paper, draw and paint a wreath.
C. Activity
Once the noodles are dry, have the kids glue them on the wreath. We created a bow tie noodle wreath and a spiral noodle wreath.
After the noodles are glued on, grab a hot glue gun to add on the poms. The adult should do this step if you are doing this with little ones.
Add a red bow tie noodle to the top of each wreath for the bow, and you have the beautiful Christmas wreath craft.
#29: Fingerprint Trees
This Christmas craft with preschoolers is too adorable and fun to make.
This Christmas craft is a wonderful keepsake to remember. Don’t forget to add the date to it when you are done!

How to do this activity
A. Materials you need
- cardstock paper
- washable paint
- glue stick
- scissors
- cotton balls
- glue
B. Set-up
Draw and cut out a few tree shapes from green and brown paper. Then, have the kids paste them together on the blue paper.
Lastly, draw some black lines to be the light strings on each tree.
C. Activity
The kids will dip their fingers in paint and make colored lights on each string! Have a paper towel nearby so they can just wipe off their finger for a new color.
They can add snow at the top of the page by using white paint.
At the bottom of the page, add some glue, and they can spread out cotton balls to look like fluffy snow!
RELATED: Winter Activities for Kids
#30: Marshmallow Snowman Craft
This had to be one of my son’s most favorite crafts we have ever done together!
It’s the best Christmas craft with preschoolers because of the marshmallows.

How to do this activity
A. Materials you need
- paper
- mini marshmallows
- buttons
- glue
- glue stick
- marker
B. Set-up
Draw a snowman shape on paper and create the accessories for the snowman out of construction paper (hat, nose, scarf, and arms).
C. Activity
Have the kids use a glue stick to attach all the pieces of the snowman. Then, they will add buttons using regular glue.
You can either outline the snowman in glue, or you can cover the entire belly. Then, your little one will stick mini marshmallows on to cover the glue.
This is such a fun Christmas and winter craft to try with the kids.
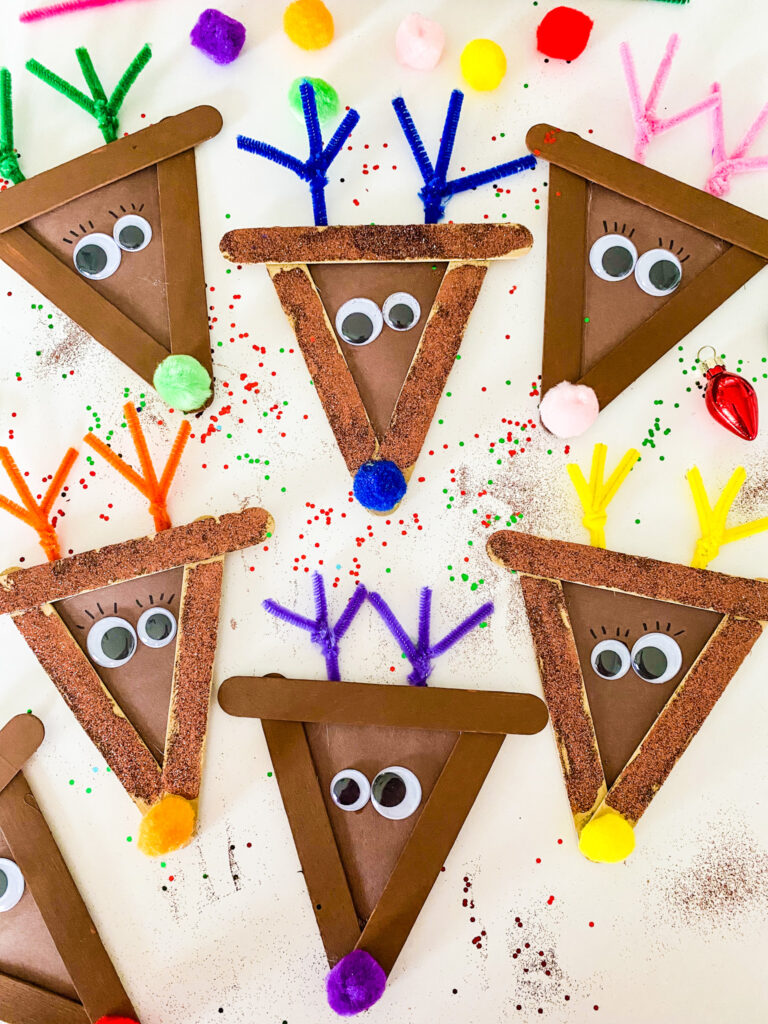
#31: Reindeer Stick Crafts
Popsicle sticks are fun and easy to make! This reindeer craft is so fun and colorful!
This is a great craft to also work on some color-matching skills too.
How to do this activity
A. Materials you need
- popsicle sticks
- acrylic paint
- googly eyes
- cardstock paper
- hot glue
- pipe cleaners
- poms
- scissors
- glitter

B. Set-up
Paint the popsicle sticks using brown acrylic paint. Then, wait for them to dry. This will take about 20 minutes. If you want to add glitter, sprinkle it onto the sticks when they are wet.
Once they are dry, make a triangle shape out of three popsicle sticks and hot glue them together.
C. Activity
Cut a triangle shape out of brown cardstock paper and glue it to the back of the popsicle sticks so you can make a face on the reindeer.
Add googly eyes to the paper.
Cut a pipe cleaner into three pieces to make the antlers for the reindeer. Make the center pipe cleaner longer and wrap two smaller pipe cleaners around it. Use tape or hot glue to attach them to the back of the sticks.
Have the kids use school glue to attach the pom as the nose! What a fun and cute reindeer craft.
#32: Paper Bag Reindeer
How adorable are these paper bag reindeer crafts? I love this can work as decor around your house too!
This is a great Christmas craft with preschoolers and they will love seeing the end result.

How to do this activity
A. Materials you need
- paper bags
- scrapbook paper
- hot glue
- glue
- tape
- scissors
- craft lights
- paper

B. Set-up
Stuff your paper bag with newspaper or pieces of crumpled construction paper. Then, fold the top of the bag over and tape it down in the back.
C. Activity
Create the pieces to make the reindeer. You’ll need to make paper eyes, antlers, a nose, and ears.
We used glitter scrapbook paper for the antlers and the ears.
Then, we used regular paper to make the eyes and ears. You can tape these pieces on or use a glue stick!
Lastly, we used craft mini lights and added a few on the antlers! Check out your cute reindeer craft! Set it up around the house for Christmas decor.
#33: Paper Strip Reindeer
Looking for a simple reindeer craft to do with your kids?
This Christmas craft with preschoolers will be such a hit and you can work on some cutting and gluing skills.

How to do this activity
A. Materials you need
- brown paper
- cardstock paper
- sparkly brown paper
- red buttons
- googly eyes
- glue
- glue stick
B. Set-up
Create strips of brown paper, then glue them on another piece of cardstock paper. You’ll want to make it in the shape of a circle.
C. Activity
To make the reindeer, add on googly eyes, a red button for the nose, and make antlers out of brown sparkly scrapbook paper.
This craft would be perfect to use as a Christmas card to send to someone special. Write a sweet message on it.
#34: Plate Reindeer Craft
This Christmas craft with preschoolers is so fun with the sparkly paper!
It’s super simple for kids to make too.

How to do this activity
A. Materials you need
- paper plates
- brown acrylic paint
- red poms
- brown paper
- scissors
- glue

B. Set-up
Cut a paper plate in a triangle shape and paint it brown! We used dark and light brown paints.
C. Activity
While you are waiting for the plates to dry, create the antlers. We used brown sparkly scrapbook paper for some of them and brown construction paper for the others.
The kids can use a glue stick to glue on the antlers or school glue.
Then, add on googly eyes and glue on a red pom for the nose. This is a simple and fun reindeer craft for kids.
RELATED: Paper Plate Crafts for Kids
#35: Handprint Reindeer
Handprint crafts are just the best.
This is a great Christmas craft with preschoolers to try, especially with the little fingerprint lights!

How to do this activity
A. Materials you need
- brown paper
- scissors
- glue stick
- sparkly paper
- paint
- marker
B. Set-up
Create a reindeer face and paste it onto paper!
C. Activity
Paint your child’s hand brown and make prints above the reindeer face that you created.
Then, make a race for the reindeer out of paper, googly eyes and sparkly paper!
#36: Reindeer Countdown Chain
Want a fun way to countdown the days till Christmas?
Make one of these adorable Christmas crafts with your preschoolers to get them excited!

How to do this activity
A. Materials you need
- paper
- googly eyes
- poms
- stapler
B. Set-up
Cut strips of brown cardstock or construction paper.
C. Activity
Create a loop by stapling the two ends of the strip of paper together. Then, make a reindeer face by gluing on googly eyes, a red pom and antlers at the top.
You’ll have to hot glue the red pom in place, so it stays!
Then, loop another of the strips through the reindeer’s face and staple that together. Keep repeating this process until you have enough links for however many days you want to countdown!
We start this on December 1st, so we create 24 links!
#37: Reindeer Pom Painting
I have a couple of different ways that you can use poms to create Christmas crafts!
These are all fun Christmas crafts with preschoolers to try.

How to do this activity
A. Materials you need
- poms
- paint
- cardstock paper
- poms
- clothespins
- washable paint
- googly eyes
- glue

B. Set-up
Draw your shapes on cardstock paper with a pencil for the kids to know where they are supposed to make prints.
C. Activity
The kids will dip the poms into paint and make prints on each of the shapes you want to make!
To make the reindeer craft, you’ll make antlers out of construction paper. The kids will make the prints first so they don’t get paint onto the antlers.
Then, they will use a glue stick to attach the antlers on!
Have the kids make prints with red and green paint and poms on the antlers. Then, make a string out of a marker around the pom prints so it looks like lights around the antler’s ears!
#38: Reindeer Pudding Cup
These reindeer pudding cups are great for a Christmas party!
Kids and adults will love these adorable reindeer pudding cups. They are an easy dessert to make.

How to do this activity
A. Materials you need
- pudding cups
- googly eyes
- sparkly poms
- cardstock paper
- scissors
- hot glue
B. Set-up
Use a hot glue gun to add googly eyes and a red pom on the front of the pudding cup.
C. Activity
Create reindeer antlers for the cup out of brown cardstock paper. Then, cut them out and hot glue them to the back of the pudding cup.
Serve for a fun snack at your Christmas party! This is such a fun and cute reindeer craft snack for everyone!
#39: Reindeer Gift Bag Craft
I have the cutest DIY gift bag idea for you to make for your kids, family members, or teachers.
This reindeer craft is simple too! I love how they turned out.

How to do this activity
A. Materials you need
- brown gift bag
- candy canes
- tape
- hot glue
- googly eyes
- poms
- Christmas tissue paper
B. Set-up
Glue the googly eyes onto the brown gift bag.
C. Activity
Use a hot glue gun to attach the red pom in the center of the bag.
Grab two candy canes and tape them to the inside of the gift bag. We used masking tape so they would hold up well.
Add your Christmas tissue paper and gift, and you are all set. This is the cutest gift bag to give for the holidays.
RELATED: Reindeer Crafts for Kids
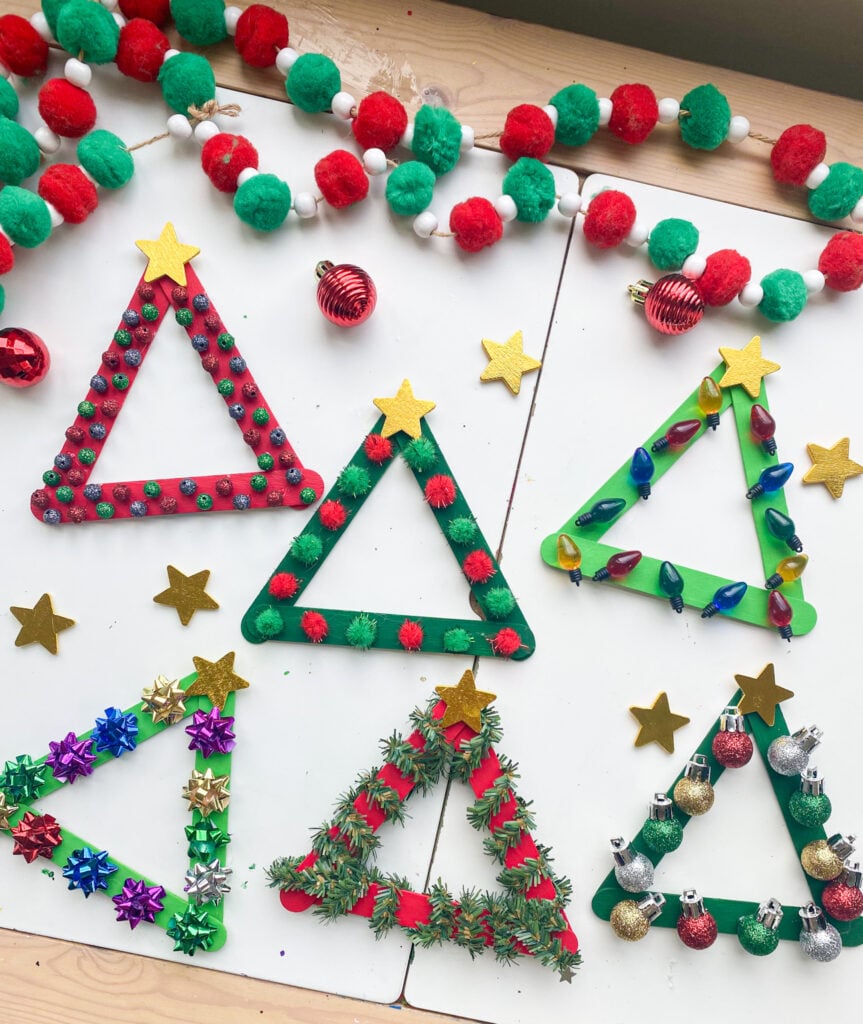
#40: Stick Tree Craft
These Christmas crafts with preschoolers are a must-try activity. They turn out absolutely beautiful.
They are so colorful and fun! My kids loved choosing the supplies for each one.
How to do this activity
A. Materials you need
- popsicle sticks
- hot glue
- construction paper
- buttons
- glitter
- poms
- mini bows
- mini ornaments
- glue
- pipe cleaners
- star stickers
B. Set-up
Grab some colored popsicle sticks or paint them using acrylic paint.
If you choose to paint them. wait for them to dry, then hot glue them in a triangle shape to make a tree! If you choose colored sticks, you can do this step right away.
Then, cut a square of brown construction paper out and paste it to the back of the sticks for the bottom of the tree.
C. Activity
Let the kids decorate the trees using the supplies you have! We used all the items that are listed in the materials section. Most can be glued on using regular school glue.
The only one that had to be hot glued on was the mini ornaments.
Place a star sticker at the top of the tree! These are adorable and turn out SO cool!
#41: Coffee Filter Christmas Trees
Coloring coffee filters never gets old! This is a classic activity that turns out beautiful.
This Christmas craft with preschoolers is a fun process to do, and it’s super simple for kids.

How to do this activity
A. Materials you need
- markers
- coffee filters
- spray bottle
- star stickers
- buttons
- glue
- glitter glue
- poms
- gems
- clothespins

B. Set-up
Color the coffee filters using a green marker. We used a light and dark green marker so they would blend together!
Spray the coffee filter using a squirt bottle. Make sure the entire coffee filter is damp. Let these air dry (this process does take a few hours to completely dry).
C. Activity
Fold the coffee filter in half by bringing the top down to the bottom. Then, bring one side over the other and flatten. This will form the triangle shapes for the tree.
To make sure that the coffee filters stay down, add a piece of tape.
Stack three of these triangles together to make one tree. To get them to stay together, add a piece of tape to each one!
Then, have the kids use glitter glue, poms, buttons, or gems for the ornaments of the tree.
Lastly, add a star sticker at the top and a clothespin at the bottom to create the Christmas tree crafts!
#42: Cardboard Christmas Trees
I found these amazing fake pine pipe cleaners at Hobby Lobby. I use them all the time for Christmas crafting.
This Christmas craft with preschoolers is fun for the kids to make, and they look like real trees!

How to do this activity
A. Materials you need
- cardboard
- box cutter
- pine pipe cleaners
- construction paper
- glue
- poms
- hot glue
- star stickers
B. Set-up
Cut triangle shapes out of cardboard using a box cutter. I love doing crafts using recycled materials like this, it’s a great lesson for the kids to show them they can create some fun and new out of materials we already have.
C. Activity
Cut the pine pipe cleaners to fit onto the tree. Then, hot glue them down on the cardboard.
Have the kids use glue to put the poms on the trees.
Tape a piece of brown paper square to the back of the cardboard for the trunk of the tree. Lastly, add a star on top!
#43: Sponge Christmas Trees
I love sponge crafts because they are easy for the kids to make!
This Christmas craft with preschoolers is great because you just new a few supplies.

How to do this activity
A. Materials you need
- sponges
- scissors
- Q-tips
- acrylic paint
- cardstock paper
- marker
- star sticker
B. Set-up
Cut out a triangle shape on a sponge.
C. Activity
Have the kids use a paintbrush and paint the sponge. Make prints on white card stock paper. Then, use a brown marker to draw the tree trunk of the tree.
Add some paint into a paint tray and have the kids use Q-tips to create ornaments on the trees!
If you don’t want to use Q-tips, you can also finger-paint the ornaments on each tree.
This is such a fun and simple Christmas tree craft.
#44: Christmas Puffy Paint
Make your own puffy paint with just a few ingredients that you probably have right at home!
I have a few different puffy paint ideas for you here, not just a Christmas tree craft.

How to do this activity
A. Materials you need
- foam shaving cream
- glue
- food coloring
- card stock paper
- acrylic paint
- googly eyes
B. Set-up
Make puffy paint by mixing equal parts shaving cream and glue. Add your choice of food coloring in.
Draw your shapes on cardstock paper.
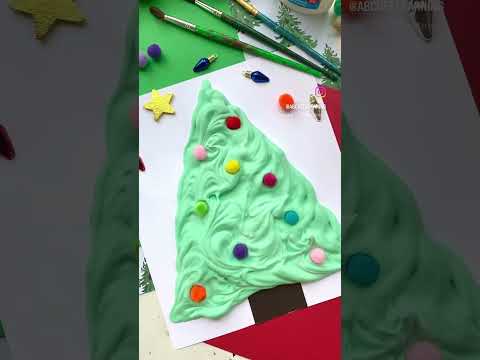
C. Activity
Have the kids use a spoon to scoop out the puffy paint and place it on the picture. Then, they will use a paintbrush to spread the paint around.
You can place items like craft poms, cardstock paper, pipe cleaners, googly eyes, sprinkles, and buttons right on the paint and they will stick!
It takes about 3/4 hours for it to dry. It does flatten over time.
#45: Rice Christmas Trees
Here’s another fun Christmas craft with preschoolers that uses sensory fillers.
We love using rice to create crafts. The process of coloring the rice is fun for the kids, and they love crafting with it.

How to do this activity
A. Materials you need
- cardstock paper
- acrylic paint
- construction paper
- tape
- googly eyes
- glue
- rice
- ziplock bags
- art trays
- parchment paper
B. Set-up
Color the rice by adding 1 cup of rice into a ziplock bag. Then, squirt some acrylic paint inside, close the bag, then shake it up until the rice is covered in the paint. Dump out the rice on an art tray that is covered with parchment paper for easy cleanup.
Repeat this process if you want to do other colors for the ornaments!
Make sure to spread the rice out on the parchment paper so it doesn’t stick together. It takes just a few minutes to dry.
C. Activity
Create your Christmas trees by drawing them on paper and then painting them using acrylic paint. Make a trunk for your tree out of brown construction paper.
If you want to add on googly eyes, glue them on and make a smile for your trees.
Then, add a thin layer of glue to the rest of the tree and spread it out using a popsicle stick. Sprinkle the rice onto the tree! You can do the green rice and then add on some rainbow rice for the ornaments!
If you don’t want to make rainbow rice, you can just glue poms on instead for the ornaments. Lastly, add a star on top!
RELATED: Sensory Activities for Kids
#46: Melted Snowman Craft
Oh no! The snowman melted! This is such a fun winter craft for kids of all ages.
It’s a wonderful way to get their imaginations going and work on writing skills.

How to do this activity
A. Materials you need
- paper
- foam shaving cream
- glue
- googly eyes
- buttons
- scissors
- markers
- sticks
Click HERE for your FREE Melted Snowman Activity
B. Set-up
Print off my FREE melted snowman printable! Then, create a puffy paint mixture (equal parts shaving cream and glue).
Create a head for the snowman using paper, googly eyes, and a marker.
C. Activity
Have kids create a melted pile of snow at the top of the page with puffy paint! TIP: I usually have the kids scoop it out using a spoon and then spread it using a paintbrush.
Place the snowman’s head on top of the melted pile of snow. Then, the kids can add on buttons and stick arms.
RELATED: Seasonal Teaching Resources
Craft #47: Snowman Doily Craft
This Christmas craft with preschoolers is EASY and quick. Kids can do this one on their own!
Sometimes you just need a quick activity to fill a few minutes. This craft is perfect for that.

How to do this activity
A. Materials you need
- doilies
- glue stick
- construction paper
- glue
- buttons
- scissors
- scrapbook paper
B. Set-up
The kids will glue down doilies on a piece of paper. We could only fit two with how big ours were.
Create a hat, arms, and scarf for the kids.
C. Activity
Your kids can glue down the hat, arms and create a face for the snowman! Then, they can glue down the buttons.
This is such an easy and fun craft- perfect for toddlers!
RELATED: Easy Toddler Activities
Craft #48: Snowman Paper Plate Craft
Try this Christmas craft with preschoolers to work on color-matching skills.
I love this snowman craft because it doesn’t require you to paint the paper plates! That part is already done 

How to do this activity
A. Materials you need
- paper plates
- hot glue
- poms
- pipe cleaners
- googly eyes
- construction paper
- glue
- acrylic paint
- circle paintbrush

B. Set-up
Create a face for the snowmen by adding on googly eyes, a nose out of construction paper, a marker, and cheeks using acrylic paint.
C. Activity
Have the kids identify what color the earmuffs should be based on the color of the cheeks.
Attach two poms to the sides of the paper plate to be the earmuffs. Then, cut a pipe cleaner and hot glue the ends to the poms!
RELATED: How to Teach your Toddler Colors
#49: Ripped Snow Craft
Creating this snowman craft for toddlers just takes a few minutes.

How to do this activity
A. Materials you need
- colored paper
- white paper
- glue stick
- googly eyes
- buttons
B. Set-up
Create three circle shapes and paste them to paper to make a snowman. Then, make the hat and arms and paste them on.
C. Activity
The kids will rip paper and paste it to the paper using a glue stick. Then, they can paste it around the snowman and on the ground.
Add googly eyes, a nose, mouth, and some buttons!
RELATED: Winter Crafts for Kids
#50: Cupcake Liner Snowman
Is this not the cutest little snowman craft for toddlers you have ever seen?
This is an adorable Christmas craft with preschoolers that takes minutes to make.

How to do this activity
A. Materials you need
- paper
- paint
- cupcake liners
- googly eyes
- marker
- scissors
- glue
- Q-tips
- buttons
B. Set-up
Create a face in one of the cupcake liners by using googly eyes, construction paper, and a marker!
C. Activity
Use a glue stick to glue three cupcake liners on in a row. Glue two buttons of the other two liners. Then, add some arms for the snowman using a brown marker.
Lastly, you can have the kids use Q-tips and white paint to make snow all around the snowman! It’s a fun way for the kids to paint, and the Q-tips make the perfect snowflakes.
RELATED: Snowman Crafts for Kids
#51: Fingerprint Christmas Cards
Create your own Christmas cards with my FREE templates!
Fingerprint cards are the best and the ones that everyone actually keeps at the end of the season.

How to do this activity
A. Materials you need
- cardstock paper
- paint
- construction paper
- glue stick
- marker
- star sticker
Click HERE for your FREE Christmas Card Templates
B. Set-up
Print off my free templates and either cut out the images and draw them on a new sheet or use them as is.
C. Activity
Have the kids dip their fingers in paint and make a Christmas tree or candy cane or just create lights!
For the candy cane, I created a background with construction paper and pasted it on white paper. Then, the kids make a candy cane shape with their fingerprints.
To make the Christmas lights card, use a marker and draw on the lines for the lights. Then, have the kids put dots across the line!
Lastly, to make the tree, outline the tree in green paint and make colored lights going through the tree.
RELATED: Holiday Printables
#52: Snowflake Pom Painting
Grab my FREE snowflake printables to try this adorable Christmas craft for preschoolers.
They always love the reveal of these projects! It’s so fun to them to see.

How to do this activity
A. Materials you need
- cardstock paper
- masking tape
- acrylic paint
- poms
- clothespins
- FREE snowflake printable
Click HERE for your FREE Snowflake Templates
B. Set-up
Print off my templates and cut out the snowflakes. Use masking tape to tape them onto the paper.
C. Activity
Have the kids add a craft pom to a clothespin. Then, they will make prints all around the paper.
They will also need to make prints all around the snowflake. Make sure they get all the little spots of the snowflake too so it turns out correctly.
Slowly lift up the snowflake templates to reveal the outcome! This is such a cute activity for kids and perfect for the holidays.
RELATED: Winter Crafts for Kids
#53: Dot Art Freebie
I have a fun and colorful freebie dot art printable for you!
This is a great Christmas craft for preschoolers to work on fine motor skills.

How to do this activity
A. Materials you need
- washable paint
- paper
- Q-tips
- free printables
Click HERE for your FREE Christmas Dot Printables
B. Set-up
Add some paint into a small paint tray and grab Q-tips. Print off my printables!
C. Activity
Have the kids color in the dots using Q-tips! They can use paint and paint on ornaments or berries on the wreath and tree.
They can also make the candy cane in any colors they want!
This is a fun and simple Christmas craft for preschoolers to make!
#54: Handprint Card Templates
These free templates will make for the perfect Christmas craft for preschoolers.
Give this to someone special for the holidays as a Christmas card!

How to do this activity
A. Materials you need
- washable paint
- cardstock paper
- free templates
- paint brush
Click HERE for your FREE Handprint Christmas Cards
B. Set-up
Print off my templates and get your paint ready!
C. Activity
Paint your little one’s hand and make prints in place of the O in the JOY and SNOW cards.
For the merry and bright card, you can paint their hands again, or you can trace them on paper.
My son didn’t want to wash his hands over and over, so we went with the paper route with that one! All super cute and simple to do.
#55: Free Christmas Countdowns
These adorable Christmas crafts with preschoolers are perfect for them to count down the days till Christmas.
Use some fun cotton balls, dot stickers, dot markers, or other materials you would love!

How to do this activity
A. Materials you need
- cotton balls
- dot stickers
- glue
Click HERE for your FREE Christmas Countdown printables
B. Set-up
Print off either countdown that you want to use with your kids at home or students in the classroom.
C. Activity
The kids will countdown to Christmas with these fun printables. Place a cotton ball on each day on the Santa and dot stickers/ dot markers on the tree!
#56: Sponge Christmas Crafts
Make your own Christmas sponges! This is a great Christmas craft for preschoolers!
You can even make this into your own Christmas wrapping paper.

How to do this activity
A. Materials you need
B. Set-up
Create the shapes on a sponge with a Sharpie and use scissors to cut them out. We made a candy cane shape, a circle for the snowman and wreath (just cut a circle for the center), and Christmas lights (oval shape).

C. Activity
Paint your sponges the colors that you want to and make prints on the paper. I love using acrylic paint for this project because of the colors, but washable paint can also be used.
We added on some details like Q-tip ornaments for the wreath, a paper scarf, and arms for the snowman and cotton balls!
#57: Christmas Sweater Craft
Christmas sweaters are a staple of the season. This Christmas craft with preschoolers is too fun!
They can decorate their sweaters however they want! You’ll love to see their finished product.
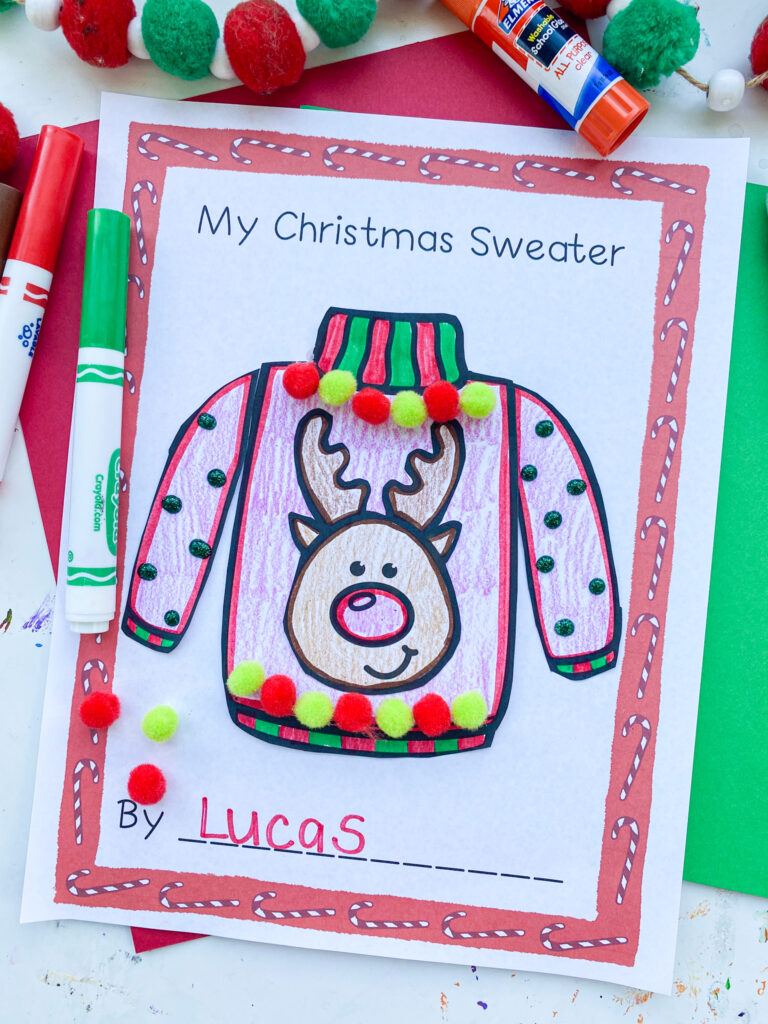
How to do this activity
A. Materials you need
- scissors
- glue stick
- crayons
- markers
- poms
- glue
- glitter glue
Click HERE for your FREE Christmas Sweater Template
B. Set-up
Print off the templates!
C. Activity
There are three sheets that come with this activity. A main template where the kids will make their sweaters, a cutout sweater page, and a Christmas picture page.
The kids will color their sweaters, cut them out, and paste them on the page.
Then, they will pick what Christmas character they want to place on the front of the sweater. Paste this on the front and decorate how they want!
We used glitter glue and poms, but if you have other little Christmas craft items, these would also be great!
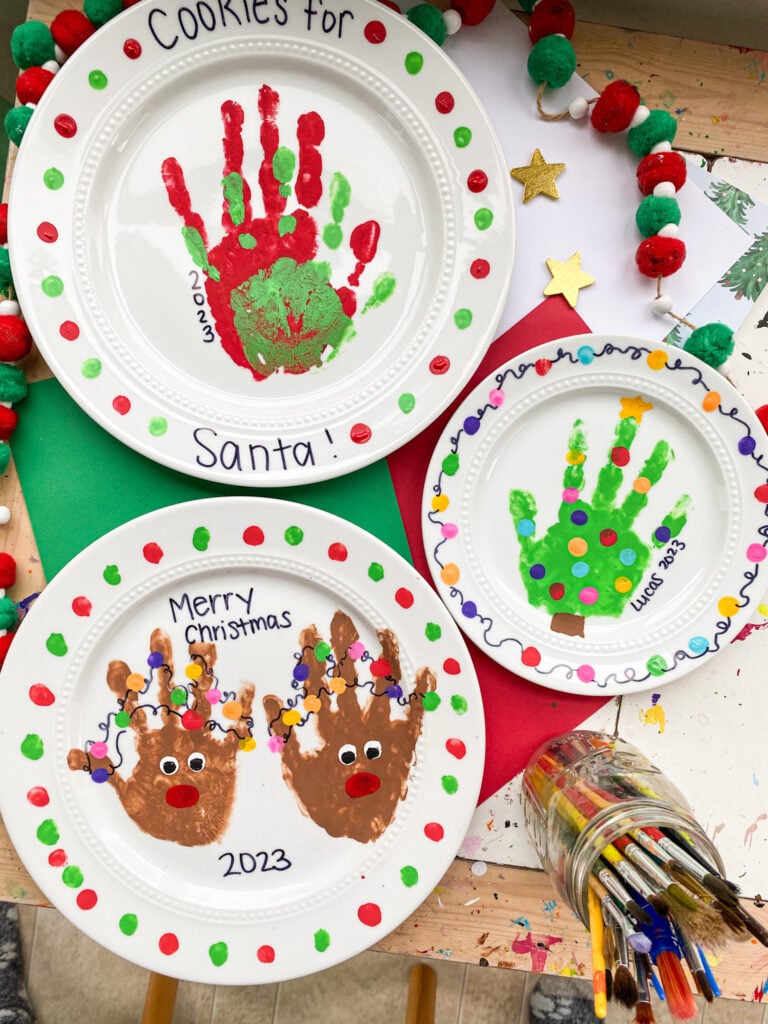
#58: Christmas Plate Craft
These adorable Christmas craft plates are fun and easy to make! These will make a great keepsake that you’ll put up around the house every year.
You can even use these for your cookies for Santa plate!
How to do this activity
A. Materials you need
- Glass or ceramic plates
- enamel acrylic paints (these are special glass paints)
- Sharpies
- Krylon acrylic paint sealer
B. Set-up
Spray your plate with acrylic paint clear sealer and let it dry (do this outside).
C. Activity
Paint your child’s hand using the enamel acrylic paints and make prints on the plate! We made a Christmas tree, reindeer, and did a mom & me one.
Let the handprint dry before you add the details (lights on the tree, eyes for the reindeer, etc.) When adding these details we used the kid’s fingerprints!
Once you add your details with the paints, let the paint dry for 24 hours.
Now, it’s time to bake! Place the plate in a cool oven, bake it at 350 degrees Fahrenheit, and hit preheat.
You are going to bake it for 30 minutes, turn off the oven, and let the glass cool.
Then, you have your adorable keepsakes! By baking it in the oven, it helps the paint not chip over the years.
#59: Handprint Oven Mitt Gift
This handprint oven mitt gift is the perfect homemade gift for someone special in your family, a keepsake for your own, or for a teacher!
It’s super easy to make too, which is always a bonus!

How to do this activity
A. Materials you need
B. Set-up
Place your oven mitt on a flat surface! Then, paint your child’s hand the color you want.
We decided to make a Christmas tree, heart handprint, and Mommy & me print.
C. Activity
Have your child make a print on the oven mitt. Make sure to press their hand down all over to get the entire print to show up.
If there’s any space you need to fix, you can always add it in with some fingerprints or a paintbrush.
Let the handprints dry completely before adding on the extras (lights, heart, etc.).
When you use fabric paint, it is machine washable once it’s dry! I’d wash it separately or even hand wash it to keep it good as long as possible.
#60: Shrinky Dink Keychains
Shrinky Dink paper is one of the coolest supplies I have ever worked with. It’s so fun to see your child’s handprint shrink down to the size of a keychain.
I love this Christmas craft for preschoolers! It’s so fun that it can be used as a keychain.
How to do this activity
A. Materials you need
- Shrinky Dink paper
- keychains
- glossy acrylic paint
- scissors
- hole punch
- baking sheet
- acrylic paint spray
- parchment paper
- Sharpies

B. Set-up
Preheat the oven to 325 degrees.
C. Activity
Paint your little one’s hand using GLOSS acrylic paint and make a print on the Shrinky Dink paper. Make sure to press their hand down so the entire thing will show up.
You have to use gloss acrylic paint, or this project will not turn out the way it should.
Cut it out using scissors and poke a hole at the top using a hole punch.
Set the handprints on a baking sheet covered in parchment paper. Bake the handprint for 2 minutes at 325 degrees. Pull it out and see if it is flat or if it is curled up. If it is curled, flatten it with a spatula.
Spray your keychain with acrylic paint spray to make sure stays good! Then, add your child’s name, the year, or a message on the keychain. Attach the keychain and give it as a present!
#62: Handprint Calendar
I have the cutest homemade Christmas craft to give out or to make for yourself.
Make this adorable and FREE handprint calendar! You will love to create this craft with your kids and it’s such a great keepsake.

How to do this activity
A. Materials you need
- cardstock paper
- glue
- scissors
- googly eyes
- paint (optional)
- binding kit
Click HERE for your FREE 2024 Handprint Calendar
B. Set-up
Print off all the pages on the binding paper that the kit came with.
C. Activity
Make the handprint crafts with your kids. We used paper because I don’t know if I could have talked my kids into doing all 12 months with paint.
Either way, it turns out cute!
January: snowglobe snowman handprint. Add faces and other fun details on each snowman.
February: handprint hearts. Make the shape of a heart with the two handprints.
March: a pot of gold handprint. Make the pot of gold out of black cardstock and then fingers with colored paper.
April: Easter bunny handprint. Kids should put their pinky finger and ring finger together and middle finger and index finger together to form the two ears! Add details for the bunny’s face.
May: flower handprint. You can also make other little flowers on the side and grass at the bottom.
June: watermelon handprints. Make three pink handprints and make the curved rind with green paper. Make seeds with fingerprints or markers.
July: Make the US flag for the 4th of July. You’ll make a blue handprint and strips of red paper for the flag.
August: icecream handprint. Make the cone out of brown paper, whipped cream out of white paper, and add a cherry on top!
Septemeber: We made apple handprints! One for each color apple and added a stem and leaf.
October: pumpkin handsprints! Make one or a few with fun jack-o-lantern faces.
November: turkey handprint! Add googly eyes a beak and the snood.
December: Make a Christmas tree for the O in JOY!
Once you are all done, put them together to make the calendar using the binding kit and following the directions!
#63: Candle Transfer Gift
This candle transfer gift is PERFECT for Christmas, birthdays, or special occasions to give to someone special.
I have some important details for this craft below in the directions so make sure you read through it all.

How to do this activity
A. Materials you need
- white tissue paper
- wax paper
- Sharpie markers
- white candle
- tape
- scissors
- hair dryer
B. Set-up
Have the kids make their drawings on white tissue paper. Make simple drawings, if you make them too complicated it will be too hard to transfer without smearing.
When the kids are doing their drawings, remind them that they are using permanent markers. Make sure to also place a piece of cardstock paper underneath so it doesn’t soak through on your surface.
I recommend also to not have that many words or if you want to add words, space out your letters a lot because I noticed this is when my smeared.
C. Activity
Once they are all done with their drawings, cut it out as close as you can to the drawings.
Place the tissue paper drawing where you want it on the candle and wrap wax paper around the candle.
You can attach the wax with tape.
Then, use a hair dryer to heat up the drawing so it will transfer.
*This is important!*
This is an adult step to the project. Place the candle on top of a paper plate so the wax won’t drip on your surface.
You are going to heat up the drawing for about 2 minutes. If you do it any longer, it will smear (I made this mistake) you can check to see if it’s transferring after 2 minutes.
It will start to look wet, so you can see if it should be transferring. Once it’s all wet, slowly peel the wax paper off the candle.
Check out your amazing candle!! I love this project.
Remind the person who you are giving this too, that is more of a decorative candle that you can display not to burn, it will get ruined.
Final Thoughts and Conclusions
I hope you found some magical Christmas crafts with preschoolers that you can try this holiday season!
Christmas is the best time of year to craft with your preschooler. You’ll make such fun memories doing these DIY crafts together!
Happy Holidays!